Show in Contents

Add to Favorites

Home: Autodesk Maya Online Help

Adjusting nParticle velocity

Lesson 2: Creating a smoke simulation with nParticles

Open the third scene for the lesson

Adjusting nParticle Shading attributes
By adjusting nParticle Opacity,
you can mimic the way smoke disappears into the air as the nParticles
age. You can then set the Color ramp
to add shades of white, gray, and blue to the smoke.
Like the nParticle Radius attribute, Opacity and Color can
be set on a per nParticle object or per-particle basis. Using the
nParticle object's Shading ramps, you can map
per-particle Opacity and Color to
nParticle properties such as particle Age, Particle
ID, and Radius.
To set nParticle Shading attributes
- To make it easier to see the changes
you make to the nParticle object’s Shading attributes,
you can hide the Volume Axis field shape by
selecting Field_Smoke1 in the Outliner then
selecting Display > Hide > Hide Selection.
The Volume
Axis field still affects your nParticles, but you no
longer see the volume shape in the scene view.
- In the Outliner,
select nParticle1_Smoke.
- In the Attribute Editor,
click the nParticle_SmokeShape1 tab.
- In the Shading section,
set Opacity to 0.1.
- Play back the simulation.
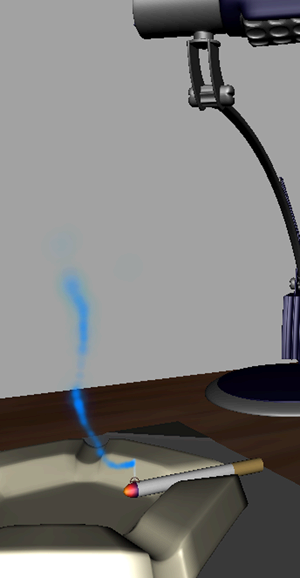
Notice that the emitted
nParticle cloud appears thinner and more like cigarette smoke than
before.
To further improve the
appearance of the smoke as it rises and dissipates in the air, you
can use the Opacity Scale ramp to adjust
the opacity of individual nParticles as they age.
- In the Opacity Scale section,
click in the ramp to create additional markers then set an Opacity ramp
by setting the following marker settings:
| Marker |
Selected Position |
Selected Value |
Interpolation |
| 1 |
0.299 |
0.980 |
Spline |
| 2 |
0.560 |
0.915 |
Spline |
| 3 |
0.709 |
0.580 |
Spline |
| 4 |
0.984 |
0.0 |
Spline |
- Set Opacity Scale Input to Normalized
Age.
As each nParticle ages
from birth (emission), its opacity changes from the opacity values
specified by the left marker to the one specified by the right marker.
- Set Opacity Scale Randomize to
0.116.
- To set the color of the nParticles when
they are first emitted, click the far left circle marker of the
ramp (at Selected Position 0) then click
the color swatch beside Selected Color.
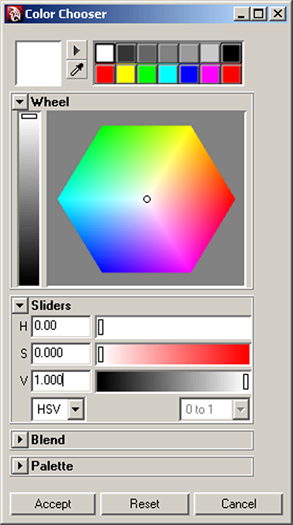
The Color
Chooser appears.
- In the Numeric Input section,
click the HSV tab.
- In the Color Chooser,
select white and add a little grey, or type the following color
values into the HSV (Hue-Saturation-Value) fields:
- To set the color of the nParticles as
they continue to age, click inside the ramp to create a marker,
set the Selected Position to 0.834,
then click the color swatch beside Selected Color.
- In the Color Chooser,
select a shade of grey that is slightly darker than the color you
selected for the first marker, or type the following color values into
the HSV (Hue-Saturation-Value) fields:
- Select the far right marker of the ramp
(at Selected Position 1.0) and
set the color to the following color values into the HSV (Hue-Saturation-Value)
fields:
- H:191.73
- S: 0.084
- V: 0.85
- Set Color Input to Normalized
Age.
As each nParticle ages,
its color changes from the color specified by the left marker to
the one specified by the right marker.
- To improve the way the nParticles colors
blend as they age, do the following:
- Set Interpolation to Smooth for
each marker.
- Set Color Randomize to
0.5.
When you play back the
simulation, the nParticles look more like cigarette smoke.
Adding more volume to
the smoke would further improve the simulation. Instead of reducing
the nParticle Opacity values, you can emit
more particles and increase the nParticle Radius to
create more smoke volume.
To add volume to the nParticle smoke
- In the Outliner,
select nParticle_Smoke.
- In the Attribute Editor,
click the nParticle_SmokeShape tab.
- In the Lifespan section,
set Lifespan to 10.
- In the Particle Size section,
set Radius to 6.5.
- In the Attribute Editor,
click the Emitter_Smoke1 tab.
- In the Basic Emitter Attributes section,
set Rate (Particles/Sec) to 128.4.
- Play back the simulation.
You can continue adjusting
the Opacity Scale and Color ramps
to create the exact dissipation effect and color you want for the
smoke.