


Learning Resources > Tutorials > Getting Started with Maya > Assets > Lesson 1: Setting up an
asset >
Creating Views
One advantage to creating a template for your asset is that you can create multiple Views for it. You can use Views to customize which attributes certain users can see in the Maya editors. For example, you can create a View that limits an animator to only the door controls and wheel spin controls and another View to limit a shader to only the truck’s body materials and textures.
Not only do Views cut down the amount of editor clutter for each artist, but it also adds a layer of protection so that users don’t accidentally change an attribute they shouldn’t have control over.
To create a View for an animator
 .
.
Notice that even though you created a new View, all the attributes are still visible in the right column. Since we only want the animation controls visible, we need to customize this View.
The template is now displayed in the Script Editor. The template is an XML file and thus is arranged with a series of tags.
<view name='Animator' template='emergency_vehicle'>
Underneath this tag, delete the following:
 +
A.
+
A.
You’ve now customized the View by leaving only the attributes an animator would be interested in. However, this is still not reflected in the Asset Editor. To see your changes, you need to refresh to the Asset Editor.
Now repeat the procedure to create a Shader view, but with the following changes:
<view name='Lighter' template='emergency_vehicle'>
Now you have two different Views that are useful for two different artists. You can switch between Views in the Asset Editor by selecting View > Name, and then selecting the name of the View you want to set.
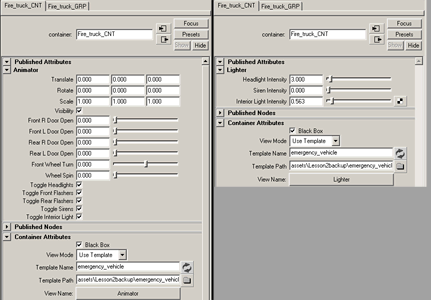
Notice that in both views, the Trans Minus Rotate Pivot attribute is hidden. This is another great use for views, they allow you to hide attributes that cannot or should not ever be modified manually, but still need to be published (for reasons that are evident in Lesson 2).
You can now close the Asset Editor and save your file.