Examples of using the Particle
Sampler Info node
To help you use the Particle Sampler Info node: we’ve included the following examples to help you learn how to use the Particle Sampler Info Node to achieve some commonly used effects. Refer to Set Particle Sampler Info node attributes for complete information on Particle Sampler Info node attributes.
Use the Particle Sampler Info node to drive a texture placement node
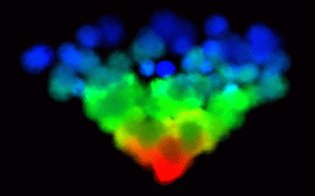
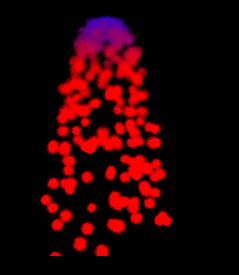
Here is an example of the first strategy—using the Particle Sampler Info node to drive a texture placement node, which textures the shader color. In this example, we’ll use the particles’ age to color the particles.
Example: Using the particles’ age to color particles
To do this, you can copy the following MEL commands from the Maya Help and paste them into the Script Editor:
emitter -pos 0 0 0 -type volume -r 100 -vsh cone -alx 8; particle; connectDynamic -em emitter1 particle1; setAttr particleShape1.lifespanMode 1; setAttr particleShape1.lifespan 2.0; setAttr particleShape1.particleRenderType 8;
 button
next to Life Incandescence to display
the Create Render Node window.
button
next to Life Incandescence to display
the Create Render Node window.
This creates a new ramp, a texture placement node, and a Particle Sampler Info node. Life Color isn’t actually an attribute at all—it’s just a control in the Attribute Editor that tells Maya to set up these connections to color for you.
You’ll see the particle color textured by the ramp as the particles age.
Now we’ll change some of the controls in the Particle Sampler Info node.

The colors are reversed—instead of the particles changing from red to green to blue, they change from blue to green to red.
 button
next to Life Incandescence.
button
next to Life Incandescence.
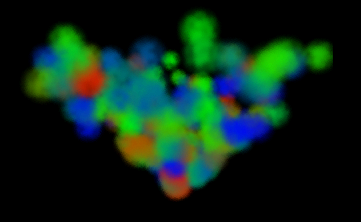
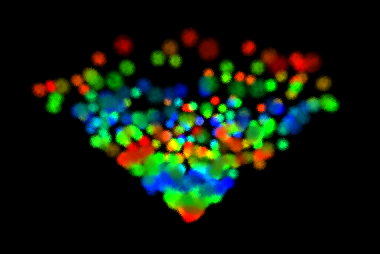
Noise is applied to the placement of the ramp creating randomness in the red, green, and blue particles.
Notice that the particles cycle through the ramp more than once as they age.
Use the Particle Sampler Info node with per-particle attributes
Here is an example of the second general strategy—driving shader color directly with rgbPP. Use this strategy when you want to use expressions or ramps driven by something other than age.
Example: Using the Particle Sampler Info node with rgbPP
To do this, you can copy the following MEL commands from the Maya Help and paste them into the Script Editor:
emitter -pos 0 0 0 -type volume -r 100 -vsh cone -alx 8; particle; connectDynamic -em emitter1 particle1; setAttr particleShape1.lifespanMode 1; setAttr particleShape1.lifespan 2.0; setAttr particleShape1.particleRenderType 8;
map button
to display the Create Render Node window.
This automatically creates a new Particle Sampler Info node and connects its color output to the color attribute. (If you had already created a Particle Sampler Info node, you could use that and connect it directly, in the connection editor.)
particleShape1.rgbPP = << mag(particleShape1.velocity) /
10, 0.0, 1 -mag(particleShape1.velocity)/10 >>;
This tells Maya to change the particle color from blue to red as the velocity increases.
Notice that the Particle Sampler Info node outIncandescence output automatically uses rgbPP if that attribute is present. If there is no rgbPP, it uses colorRed/colorGreen/colorBlue, if they are present.
The advantage of using rgbPP is that you can set or animate its value in any of the ways available for per-particle attributes, and see the results in software. You will also then be using the same color attribute in both hardware and software rendering.
However, rgbPP can be animated only with expressions and ramps (or the component editor). The advantage of using Life Color is that you get a texture placement node and can make use of its additional controls. In particular, you can use any texture, not just a ramp, since you get both u and v control. You can connect any compatible Particle Sampler Info node attribute you want.
Set transparency with the Particle Sampler Info node
As with color, Life Transparency is still available. It uses the outUvCoord attribute of a Particle Sampler Info node in conjunction with a texture placement node, instead of a particle transparency mapper and age mapper.
As with color, you can use per-particle attributes such as opacityPP directly. You use the outTransparency attribute of the Particle Sampler Info node.
Example: Creating fading particles
To do this, you can copy the following MEL commands from the Maya Help and paste them into the Script Editor:
emitter -pos 0 0 0 -type volume -r 100 -sro 0 -spd 1 -vsh cylinder -afx 1; scale -r 5 0.5 5 ; particle; connectDynamic -em emitter1 particle1;
opacityPP = 1 / (0.01 + mag( position ));
(We added 0.01 in the denominator to avoid dividing by zero when particle is at the origin.)
button
for Transparency (not Life
Transparency).
This create a new Particle Sampler Info node and connects its outTransparency to the shader transparency. As with color and incandescence, the outTransparency output automatically uses opacityPP, if that attribute is present, otherwise it uses opacity.
Opacity and transparency have an inverse relationship: the more opaque something is, the less transparent it is. If you connect the outTransparency output of the Particle Sampler Info node, then the node automatically converts opacity to transparency so that you get the right result.
Control noise on a per-particle basis
You can connect any per-particle attribute to the attribute in the shader that you want to control. You can then put an expression on the per-particle attribute to control it exactly the way you want.
To do this, you can copy the following MEL commands from the Maya Help and paste them into the Script Editor:
curve -d 3 -p -6.861087 0 7.36723 -p -2.43128 0 2.685247 -p 2.685247 0 -2.43128 -p 6.968851 0 -6.714884 -k 0 -k 0 -k 0 -k 1 -k 1 -k 1 ; emitter -type curve -r 100 -sro 0 -nuv 0 -cye none -cyi 5 -spd 6 -srn 0 -nsp 0 -tsp 0 -mxd 0 -mnd 0 -dx 0 -dy 1 -dz 0 -sp 0 ; particle;
connectDynamic -em emitter1 particle1;
Now we’ll use any per-particle attribute you aren’t using. For example, we have no need of parentU and parentV here, so we’ll use that.
parentU = 0.7 + 2*(age/finalLifespanPP); parentV = age /(1.5*finalLifespanPP);
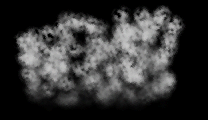
We want the particles to get less dense and more noisy as they age, the way smoke would.
button
next to noise.