Subfolders and names of
rendered images
You can create subfolders as well as custom filenames for storing your rendered images using the File Output section in the Render Settings: Common tab.
This section describes the tokens that you can input to create the subfolders and filenames. Should you decide not to input any of the tokens described below, Maya creates default subfolders in which it saves the rendered images.
For more information regarding project file locations, see File > Project > New of the Basics guide.
Default behavior of rendered images and directories
By default, Maya saves rendered images to the following subfolders:
Scenes with more than one render layer and renderable camera
If your scene consists of more than one render layer, then a subfolder is created for each layer.
Similarly, if your scene consists of more than one renderable camera, a subfolder will be created for each camera.
For example, a scene with two render layers and two renderable cameras would save out rendered images to subdirectories as follows:
Scenes with only one render layer or only one renderable camera
By default, a layer subfolder is not created for a scene with only one render layer. Therefore, a scene with two renderable cameras but only one render layer creates subfolders as follows:
Similarly, a camera subfolder is not created by default for a scene with only one renderable camera. Therefore, a scene with two render layers but only one renderable camera creates subfolders as follows:
If a scene has only one render layer (or no layers at all) and only one renderable camera, then subfolders are not created by default and Maya saves the scene as MyScene.iff.
Creating subfolders and filenames for rendered images
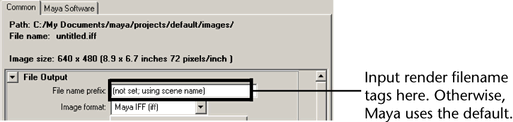
The following rendered image filename options and tokens can be combined to create subfolders and custom image names for rendered images. Enter these options in the File Name Prefix field of the Render Settings: Common tab.
Use the tokens in conjunction with different separators between them. To create subfolders, use the slash (/) separator as in <RenderLayer>/<Camera>/<Scene>. Use any other separator, for example, underscore (_) and dash (-), to separate the tokens in your image file name.
You can repeat options within the specification, and you can also specify any text you like in the image file name or path (for example, .TEST or _final to indicate the kind of render that you are performing).
Rendered image filename options (tokens)
Adds the layer name to the created subfolder or image file name (for example, layer1).
When using render passes with the Maya software renderer, if more than one pass is created for the layer, then pass names are appended to the layer name. The format used is layer_pass (for example, layer1_beauty). For more information on passes, see Render passes. When using multi-render passes with the mental ray renderer, a directory is created for each pass. See Multi-render passesfor more information.
Adds the render pass file group name to the created subfolder or image file name (for example, IndirectIllum). See Pass Group Name for more information regarding the pass group name.
Many different types of render passes are available for selection using the Render pass Attribute Editor, for example, beauty, shadow, specular, refraction, and so forth. When you use this render token, a unique abbreviation of the pass type, of less than 6 characters, is appended to your output file name, for example, REFR for refraction pass.
Among the available multi-channel file formats, OpenEXR is the only file format where multi-channel is being leveraged. Therefore, multiple render passes can be concatenated into a single-multi-channel .exr file. Use the Frame Buffer Naming and Custom Naming String attributes in the Render Settings: Common tab to customize the naming of your OpenEXR channels.
In order to use these attributes, your scene must contain at least one render pass. Also, you must select OpenEXR as your file format for these attributes to become active.
Select the Automatic mode under the Frame Buffer Naming attribute to use the <RenderPassType>:<RenderPass>.<Camera> tokens to name your channels. This is the default option.
Select the Custom mode under the Frame Buffer Naming attribute to customize your OpenEXR channel names. Choose from the render tokens listed in Rendered image filename options (tokens).
Your frame buffer name must be less than or equal to 28 characters in length. Otherwise, the name is truncated and a warning appears.
See Render Settings: Common tab for more information.
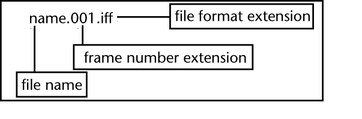
In addition to the rendered image filename tokens discussed above, you can also use the Frame/Animation Ext drop-down list to customize your image name by adding the frame number to your image name. For example, if you choose name#.ext with a Frame padding of 4, and the scene name is MyScene, then the rendered image would be named MyScene0001.iff.
<Layer>/<Camera>/IMAGENAME.iff
<Layer>/<Camera>-<Scene>
<Scene>_<Layer>_<Camera>
<Scene>/<Layer>/<Camera>/<Scene>TEMP