An attribute map is a two-dimensional image with values that correspond, or map, to attributes of points on a three-dimensional surface. This mapping is relative to the U/V parameterization of the surface.
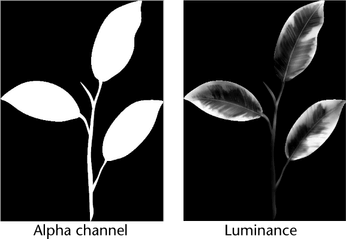
You can import image files created in other programs and use their alpha channel values or luminance values as attribute maps. The alpha channel is the channel in an image that contains the opacity information. Not all images have an alpha channel. Luminance refers to the intensity or brightness of the image.
Attribute map values are represented by grayscales, with black representing a value of 0 and white representing a value of 1.
You can also export the values on your Artisan surfaces into image files.
You can import and export attribute maps in any file format supported by Maya. For a list of these file formats, see the Basics guide.
The Artisan brush tool you select, and its settings, determine the result you get when you import an attribute map to a surface. Artisan maps the attribute values onto the surface vertices relative to the U/V surface direction and applies the Artisan tool settings to the vertices using the mapped values.
Import Artisan attribute maps to multiple surfaces
If the attribute map was created from multiple surfaces in Artisan (see Export attribute maps) and you want to import the map for these surfaces back to the same surfaces, the file names of the attribute map must match the surface file names. Also, you must turn on Reassign Attribute Maps when you import.
For example, suppose you create the following two surfaces and export the attribute map, calling it xando.
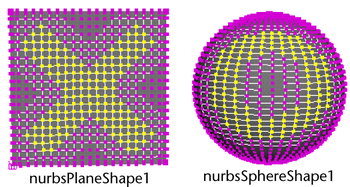
Artisan creates two files, xando_nurbsPlane1_nurbsPlaneShape1 and xando_nurbsSphere1_nurbsSphereShape1. It saves the attribute maps separately for each surface in these files.
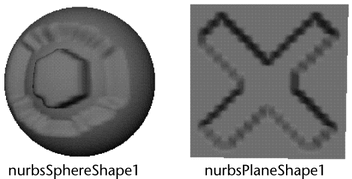
To import these maps back to the same surfaces, follow steps 1 through 6 under To import an attribute map. For step 7, import either the base file (xando) or one of the files associated with the surface (xando_nurbsPlane1_nurbsPlaneShape1 or xando_nurbsSphere1_nurbsSphereShape1). Artisan automatically maps each file to the appropriate surface.
In the following example, the attribute was imported with the Sculpt Geometry Tool selected and set to Push.
If you do not turn Reassign Attribute Maps on, the imported file maps to each selected surface.
You can export attribute maps created with the Paint Selection, Paint Scripts, Paint Vertex Color, Paint Attributes, Paint Cluster Weights, Paint Jiggle Weights, Paint Soft Body Weights, Paint Fluids, and Paint Fur Attributes. The values you paint with these tools become either the luminance values or alpha values in the attribute map (except for the Paint Vertex Color Tool, from which you can export RGB and RGBA values).
If you select more than one surface in step 2, Artisan concatenates the name you type with each surface name and creates a file for each surface.
For example, suppose you select two surfaces called nurbsSphereShape1 and nurbsSphereShape2, and type checker for the map name. Artisan saves the attributes of nurbsSphereShape1 in the file checker_nurbsSphere1_nurbsSphereShape1 and the attributes of nurbsSphereShape2 in the file checker_nurbsSphere2_nurbsSphereShape2. If you include the file name extension (for example, checker.rgb) Artisan appends the extension to the concatenated names (for example, checker_nurbsSphereShape1.rgb and checker_nurbsSphereShape2.rgb).
To import these attribute files, the surfaces you import them to must have the same name as the surfaces with the original attributes.
For more information on importing attribute maps, see Import Artisan attribute maps to multiple surfaces.


