


Edit spring operation
The techniques for editing spring operation are described in these topics:
You can set all spring attributes in the Spring options window before you create the spring. You can change many settings in the Attribute Editor after you create the spring.
Settings available in the Attribute Editor
To use the Attribute Editor, select the spring object that’s created when you create the springs. The following attributes are also available in the Spring options window.
Lets you set stiffness, damping, and rest length for individual springs. See Edit per spring rest length, stiffness, and damping.
If you use the Attribute Editor to change the setting of Per-spring Stiffness, Per-spring Damping, and Per-spring Rest Length from off to on after you create springs, Maya uses the Stiffness, Damping, and Rest Length attribute values that apply to all springs in the spring object.
Sets the rigidity of the springs. If you increase the stiffness of springs too much, the springs might stretch and contract excessively (see Fix playback problems).
Note that you can adjust the bounciness of a colliding soft body by changing the stiffness.
Mutes the spring action. A high value causes spring length to change more slowly. A low value causes the length to change quickly. You can use a low Damping value and a high Stiffnessvalue to create a jiggle effect.
Sets the length for the springs when they are at rest. Every spring in the spring object is set to the same Rest Length value.
The springs try to reach their rest length when you play the scene. If you set it to a value smaller than the length of the spring, the spring contracts when you play the scene. If you set it to a value that is larger than the length of the spring, the spring expands.
Add or remove springs after creation
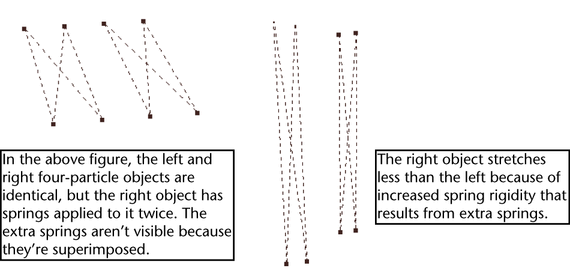
After you create springs on an object, you can add or remove selected springs to tune the spring effect. This is useful if you need to add a few more springs to an object between points previously without springs. You can also add two springs to the same pair of points to increase rigidity. A single stiff spring has an attractive force that differs from two springs set less stiffly.
To add more springs to an object
To remove selected springs from an object
 (Linux
and Windows) or
(Linux
and Windows) or  (Mac
OS X) key.
(Mac
OS X) key.
Edit per spring rest length, stiffness, and damping
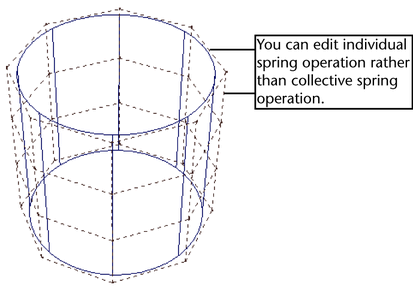
If you turn on Per-spring Stiffness, Per-spring Damping, or Per-spring Rest Length in the spring object, you can edit stiffness, damping, and rest length for individual springs.
To edit the per spring attributes
 (the Select
by Component Type icon), then limit selection to springs.
See Basics for details.
(the Select
by Component Type icon), then limit selection to springs.
See Basics for details.
The Springs tab of the Component Editor displays rest length, stiffness and damping values for the selected springs. The attribute names end with PS, which indicates you can set the attributes on a per spring basis.