


Control complex motion and forces
The following sections describe techniques for controlling complex motion and forces, including,
Keying impulses to rigid bodies
You can key an impulse on and off to instantaneously change a rigid body’s velocity, for instance, when a bat hits a baseball.
For example, select a keyframe in the Time Slider, select the attributes in the Channel Box, then right-click the Time Slider and select Tangents > Stepped. Repeat this for each keyframe.
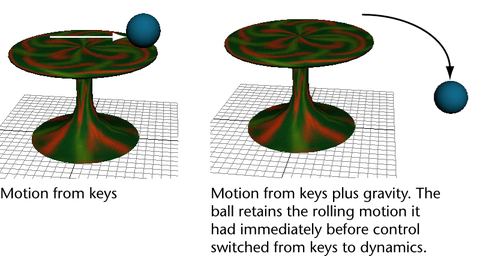
Combine rigid body dynamics and keys
When a rigid body is passive, you can animate it by keying its Translate and Rotate attributes. When the rigid body is active, you can animate it with dynamics, specifically fields and collisions. Sometimes you’ll want to use a combination of keys and dynamics. For instance, you can roll a ball off a table with keys then cause the ball to fall with gravity.
This keys the Active attribute to the off setting and keys the object’s current Translate and Rotate attribute values.
This keys the Active attribute to the on setting and keys the object’s current Translate and Rotate attribute values.
At a subsequent frame, you can switch control from dynamics to Translate and Rotate keys by selecting Soft/Rigid Bodies > Set Passive Key.
This keys the Active attribute to the on setting and keys the object’s current Translate and Rotate attribute values.
This keys the Active attribute to the off setting and keys the object’s current Translate and Rotate attribute values.
At a subsequent frame, you can switch control from Translate and Rotate keys to dynamics by selecting Soft/Rigid Bodies > Set Active Key.
Get data on velocity, forces, and collisions
A rigid body has read-only attributes that contain its current velocity and any forces and collisions applied to it. This section describes these attributes.
Force, velocity, spin, and torque attributes
When you select a rigid body, the Attribute Editor shows the current X, Y, and Z component values for Velocity, Spin, Force, and Torque. You can also query these attributes in MEL commands or expressions by using the attribute names in the following table.
A rigid body has read-only attributes that contain data on the contact made with it during collisions. You can query the attributes in MEL commands or expressions by using the attribute names in the table that follows.
To accumulate data in these attributes, select the solver that controls the rigid body, display the Rigid Solver States section of the Attribute Editor, then turn on Contact Data attribute. The attribute values are zeroed out each time you turn on Contact Data. Turning on Contact Data slows playback.