


Learning Resources > Tutorials > Getting Started with Maya > Character Setup > Lesson 1: Skeletons and
kinematics >
Posing and animating using
inverse kinematics
Next, you create IK handles that you’ll later use to pose the arms and legs. The next steps describe some initial setup you should perform before creating the IK handles.
To set up the character prior to creating IK handles
This sets the current joint angles throughout the skeleton as the preferred angles. This is a useful step after you complete a skeleton. Maya thereafter uses the current bend in the knees and elbows as the preferred initial rotation direction of these joints during inverse kinematics (IK) posing. This makes it easier to pose the character with motion that is natural for a human character.
To create, pose, and animate IK handles for the legs
 .
.
This type of IK solver has characteristics that work well for this application.
This creates an IK handle that lets you control all joints from left_hip through left_ankle. The handle’s main manipulator is at the left_ankle.
The IK handle is the selected object after you create it. If you unintentionally cancel the selection of the handle, you can select it again by clicking the left_ankle—the last joint you clicked after using the IK Handle Tool. Whenever you select a handle, make sure you do not select joints or other objects along with the handle. You can check the Outliner to confirm your selection.
This completes a simple animation of the leg using an IK handle to control its position.
To practice additional IK techniques
No matter how far you drag the handle manipulator, the joints of the leg will not stretch beyond the straight leg position. This is desirable; you do not want the size of a skeleton to change as you pose it. However, if you drag a leg joint, the bone hierarchically above that joint will lengthen. This is why it’s important to check that you haven’t selected a joint with the IK handle before you move the handle.
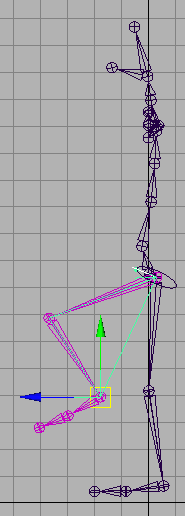
As you drag the handle to some positions, you might notice the leg joints flip abruptly (see the next figure for an example position). It’s therefore hard to control the leg positioning in this region.
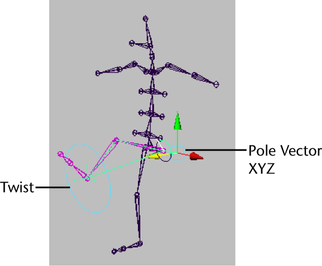
The default IK handle (IK Rotate Plane handle) has manipulators you can use to avoid joint flipping. With the handle selected, select Modify > Transformation Tools > Move Tool, Rotate Tool, Scale Tool, Show Manipulator Tool. Move the Pole Vector XYZ manipulator to a slightly different position (see the following figure).
If this doesn’t solve the problem, rotate the Twist manipulator to rotate the leg. You can key the Pole Vector XYZ and Twist attributes to fixed values to avoid the flipping as the character moves.
A more precise way to avoid joint flipping, which requires some initial setup, is to use a Pole Vector Constraint. For more information see the Maya Help.
To create, pose, and animate IK handles for the arms