You can select a container in either the Outliner or Hypergraph Connections editor. Like many other nodes, container nodes are not visible in the scene panel. In the latter window, containers appear as a node with beveled corners (for more information, see Parts of an asset). You can view or hide the contents of the container at any time by expanding or collapsing the container.
In the Outliner you can filter your view to display only containers by selecting Show > Objects > Container.
You can select all the containers in your scene at once by selecting Edit > Select All by Type > Containers.
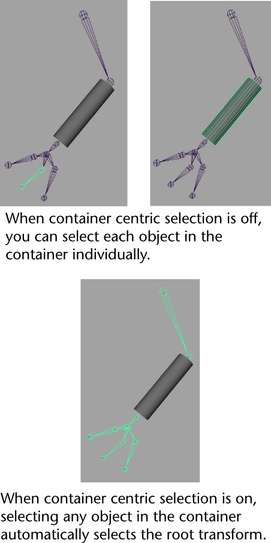
You can customize Maya to select the first published node of a container (a root node, the first parent, or the first child in that order) whenever any node in a container is selected in the main scene panel. This is useful in complex scenes, especially with hierarchies, where you usually only want to select a small subset of the objects.
For example, in a character scene where a skeleton and its skin are placed in the same container, an animator may have trouble selecting the skeleton behind the skin. However, if the skeleton is published as the container’s root transform, the animator could then select the underlying skeleton just by selecting the skin.
To select a container by its root transform
Now if you select any object in the container in the scene panel, the object that you set as the root transform is automatically selected instead.
Selecting root nodes works differently if one of the transformation tools is active. In this case, Maya selects the first node with the appropriate published attributes above the selected node.
![]()
For example, in the above hierarchy, pSphere1 is published as container1’s root node. If Container centric selection is on and you select pCylinder1 with the Move Tool, Maya selects pCube1 if it has one or more published translation attributes. Even if pSphere1 also has published translation attributes, Maya still selects pCube1 because it is the first node with the appropriate published attribute(s) encountered by a traversal up the hierarchy.
In this case, if you select the Rotate Tool or Scale Tool and select pCylinder1, Maya selects pSphere1 because pCube1 does not have any published rotation or scale attributes.
To view a container’s root transform
The Root Transform field displays the current published root node. If the word None appears then the current root node is the default. You can quickly go to the root node by clicking the icon next to the Root Transform field.


