Show in Contents

Add to Favorites

Home: Autodesk Maya Online Help

Create polygon primitives

Polygon creation

Create polygon primitives using the Create menu

Create polygon primitives
interactively
You
can position, scale, and adjust various attributes on primitives
as you create them using the Interactive Creation feature. Interactive
Creation is turned on by default.
The Interactive
primitive creation feature lets you create primitives
in two ways:
- Click-drag in the scene to interactively
position and adjust the primitive’s attributes.
- Click once in the scene to create a primitive.
A primitive is created where you click. The primitive’s options
are set by selecting
Create > Polygon Primitives >
Primitive Shape >
 .
.
The Exit
on Completion option (turned on by default) automatically
exits the primitive creation tool once you have created the primitive.
If you want to create multiple primitives, turn off
Create > Polygon Primitives > Exit
on Completion.
The steps for creating
a polygon primitive interactively consist of multiple click-drag
operations in the scene view. The number of click-drag operations varies
depending on the primitive type:
NotePressing Enter at
any point during the interactive creation process immediately completes
the primitive creation and skips any remaining attributes.
If you want to skip interactively
setting an attribute during the interactive creation process, single-click
with your mouse to move to the next step.
Before you start:
- Turn on
Create > Polygon Primitives > Interactive
Creation if necessary.
- Select
Create > Polygon Primitives,
and choose the primitive type, or select the primitive type from
the Polygons shelf.
If you want to change
the non-interactive attributes that a polygon primitive is created
with, such as Radius, Divisions, or Texture Mapping UVs, select
Create > Polygon Primitives >
Primitive Shape > .
| Primitive type |
To create the primitive interactively |
Sphere, Torus, Pyramid, Soccer
Ball, Platonic Solids
|
- In the scene view, click-drag to create
the primitive.
The initial click-drag
specifies the location for the primitive as well as the radius or
scale for these primitive types.
The Torus primitive has
an additional click-drag step to specify the Section
Radius attribute.
- In the scene view, click-drag to specify
the subdivisions along the height and width of the primitive using
the left mouse button.
The Soccer
Ball and Platonic Solids primitives
do not have a subdivisions step.
|
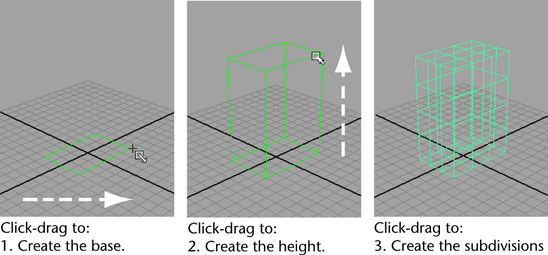
Cube, Cylinder, Cone, Prism
|
- In the scene view, click-drag to create
the primitive.
The initial click-drag
specifies the location for the primitive as well as the shape of
the base of these primitive types.
- Click-drag to specify the height of the
primitive.
- Click-drag to specify the subdivisions
along the height, width, and depth of the primitive.
Note: The number of click-drag operations
for the subdivisions varies depending on the primitive type.
|
Pipe, Helix
|
- In the scene view, click-drag to create
the primitive.
The initial click-drag
specifies the location for the primitive as well as the radius/width
of the primitive.
- Click-drag to specify the height of the
primitive.
- Click-drag to specify the following attributes
for these primitive types:
- Pipe - specifies
the thickness of the pipe.
- Helix - specifies
the number of coils.
Note: The Helix primitive
has an additional click-drag step after the number of coils to specify
the Radius attribute.
- Click-drag to specify the subdivisions
along the height, width, and depth of the primitive.
|
When the primitive creation
steps are complete, the wireframe color for the primitive changes
from a bright green to the green color for an actively selected
object.
TipTo set the axis for
your primitive during interactive creation, you can use the orthogonal
views. Whichever view you create your primitive in—top,
front, or side—is the way your primitive’s axis will be
aligned (y, z, or x).
NotePrimitives with caps
(Pyramid, Cylinder, Cone,
Pipe) have an additional attribute called Adjust
cap subdivisions after create that is turned off by default.
When you turn this feature on in the primitive’s tool options window,
an additional step is added to the interactive creation process
for those primitive types.
Holding down the Shift
and Control keys during primitive creation has the following effect:
| Modifier key |
Effect |
(None)
|
Grows plane and cube
primitives from one corner. Grows all other primitives from their
center.
|
Control
|
Grows plane and cube
primitives from their center. (No effect on all other primitives.) When
adjusting primitive attributes in subsequent interactive steps,
pressing the Control key momentarily reduces the mouse speed.
|
Shift
|
Constrains all primitives
to three-dimensional equilateral proportions and grows them from
their base. When adjusting primitive attributes in subsequent interactive
steps, pressing the Shift key momentarily increases the mouse speed.
|
Control + Shift
|
Constrains all primitives
to three-dimensional equilateral proportions and grows them from
their center.
|
To
create a polygon primitive with a single click
- Select
Create > Polygon Primitives > Interactive
Creation. (Ensure that a check mark appears beside the Interactive
Creation menu item)
If you want to change
the settings that the polygon primitive is created with, such as Divisions or Texture
Mapping, select
Create > Polygon Primitives >
Primitive Shape > .
There are specific single-click
settings for primitive creation.
- Click in the scene view to create the
primitive.
To create multiple polygon primitives
interactively
- Select
Create > Polygon Primitives > Exit
on Completion to turn off the feature. (Ensure that a
check mark does not appear beside the Exit on Completion menu
item.)
You can create multiple polygon primitives
in succession without having to return to the Polygon
Primitive menu or Shelf.
Useful interactive creation
options
During
interactive primitive creation, you can snap the polygon to existing objects
in the scene. You have the following options (click the icon in
the Status line or press the hotkey).
Snap to:
- grid
- curves
- CV, vertex, or pivot
- live object
These features let you
snap to a projected point on the line or plane defined by any other
object in your scene while you create the primitive. For example,
you could create a cylinder to act as a telescope on the dome of
an observatory.
TipSome grid snap operations
may limit the interactive primitive creation in the perspective
view. For example, if you turn on grid snap and interactively create the
base of a cube, you will not be able to vertically drag to create
the height component if the grid snap option is left on while working
in the perspective view.
Instead, create the base
of a cube in the perspective view, then switch to a front or side
orthographic view to snap the height of the cube using the grid as
a reference.
For more information,
see
Snap to the grid, a curve, points, or a view plane and
Snap all creation tools to a surface or construction plane.
 +
+  .
.