


Convert textures to a polygon
mesh
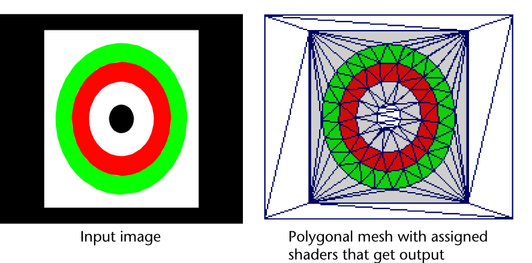
You can convert a texture image into a polygon mesh using the Modify > Convert > Texture to Geometry feature. Texture to Geometry converts an image into geometry by creating a polygonal mesh that is subdivided based on the colors in the image. The subdivided faces on the mesh may then be assigned a shading material with a similar color to the original image. The subdivided polygonal mesh can be used as is or, if the image was mapped onto geometry it can be made to wrap around the original polygon mesh so that it appears in the same location as the original texture map.
Texture to Geometry is useful in the following situations:
For example, texture to geometry conversions can be used as an aid to converting shading material information to color per vertex information (CPV) for prelighting when CPV is the preferred workflow.
Prelighting, also called texture baking, is a process that is widely used in video game production whereby the pixels on a texture map are assigned RGB color values based on the lighting information that the surface mesh receives during rendering. Rather than rendering the lighting in real time, a texture map is produced or baked to make areas of the scene appear lit. This frees up the limited processing resources of the games console for other computational work that is required in real time.
Color per vertex information is widely supported and used in game consoles as a technique to display shading and illumination without having actual lights involved in the real-time render calculation. CPV quality is dependent on the level of detail in the polygon mesh and texture to geometry can enhance the results by adding polygon detail to the mesh where it is needed most to represent lit areas in the scene.
You first need to bake a texture using the Batch Bake feature to produce a texture map of the surface with lighting. You then use the Texture to Geometry feature to convert the baked texture information to geometry. Finally, use the Batch Bake feature one final time to convert the shading information produced by the Texture to Geometry feature to CPV (color per vertex information).
Texture to Geometry produces a polygonal mesh in four phases:
There are two basic workflows possible with Texture to Geometry. It is possible to:
To convert an assigned texture to a polygonal mesh
It is important that you select only a single surface when converting a texture to geometry. If the object is comprised of many grouped surfaces, you can use the Outliner or the Hypergraph to select a single surface that has the assigned texture.
 .
.
Because it is possible to have multiple textures assigned to a surface, you must specify which image you want converted in the Input Image text box.
A polygonal mesh is created and placed above the texture on the selected polygon surface in the scene view. Whenever Fit to Selection is turned on (default), the resulting surface mesh is positioned above the selected surface in the scene view.
It’s not necessary to have a surface with an assigned texture in the scene in order to produce a polygonal mesh for an image. You can select the Texture to Geometry feature and specify an image in the options window, turn off the Fit to Selection option, and the resulting polygonal mesh will appear at the origin in the scene view.
To convert an image to a polygonal mesh
.
The resulting polygonal mesh is created and placed at the origin of the scene view along the X,Y plane.
Convert Texture to Geometry workflow tips
Calculations for the segmentation phase of the feature are computational intensive and are affected by two factors.
The minimum image size should be no smaller than 256 x 256 pixels with an upper range of 4000 x 4000 pixels. Ideally, use input images in the range 400 to 512 pixels in one dimension. If your input image exceeds these guidelines you can resize the image using an image editing application prior to using the feature.
Texture to Geometry works well with images that contain well defined color features. For example, a bold colored logo with a clearly defined contrasting background is well suited for use with the feature.
Texture to Geometry does not work efficiently with images that have many random colors. For example, a noise texture would not be suitable. These types of images make it difficult for the segmentation algorithm to detect groups of related RGB color values that allow the feature to determine boundaries for subdivision of the polygonal mesh. In addition, images that contain subtle color artifacts as a result of image compression may be problematic. In these situations, it may be necessary to clean up the color artifacts in the image using an image editing application before using the Texture to Geometry feature.
For accurate fitting of the surface the UVs must be non-overlapping and should be within the 0 to 1 texture mapping range as they appear in the UV Texture Editor. When specifying an alternate UV set, the name of the UV set you specify must explicitly match the name of the UV set as it appears in the UV Texture Editor.