Edit attributes of an emitter
The attributes of the emitter control the initial position, direction, quantity, and speed of the emitted particles. You can set the emitter options before you create the emitter, or you can create a default emitter and set the attributes after the emitter is created.
To set emitter options before creating the emitter
 or
Particles > Emit from Object > .
or
Particles > Emit from Object > .
Changes you make to the options window affect emitters you create after the changes.
To edit emitter attributes after creating the emitter
If you see clumps of particles or irregular emission direction when you animate the motion of an emitter, try the following remedies to smooth the emission:
Make sure the Playback Speed is set to Play every frame in the Playback Speed pulldown in the Timeline category in the Window > Settings/Preferences > Preferences window.
Increase the Rate or Max Distance setting in the emitter.
Select Solvers > Edit Oversampling or Cache Settings to increase the Over Samples value.
Set emitter attributes by typing entries
You can set the following attributes in the options window, Attribute Editor, or Channel Box:
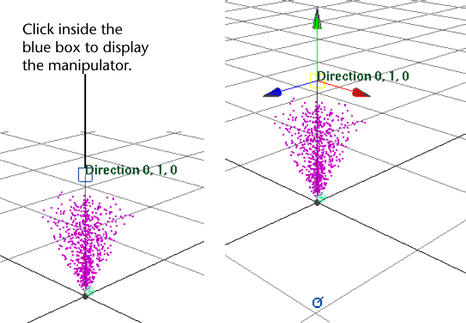
Change emitter attributes with workspace manipulators
You can use manipulators in the workspace to edit several emitter attributes:
The manipulators offer an interactive alternative to typing entries in the Attribute Editor.
To use a manipulator on an attribute

A yellow attribute manipulator appears next to the emitter object. Dolly towards the manipulator to get a clearer view. Initially the attribute manipulator controls the Rate setting. An attribute toggle also appears near the emitter. It controls which attribute you can manipulate.
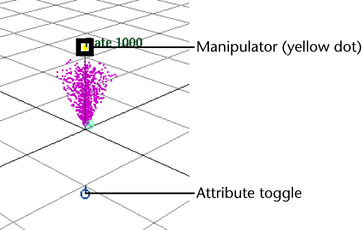
Each time you click the attribute toggle, you display a different attribute manipulator. The manipulator is an icon (often a dot) you typically drag to change its value. Details specific to attributes are in Use manipulator icons. The color of the manipulator and attribute toggle indicates which is active. Yellow is active, blue is inactive.
After clicking the attribute toggle a number of times, you’ll see a display mode where all the manipulator icons are displayed without the attribute names. When you click an icon in this mode, the attribute name appears next to it. You can then manipulate the attribute. Click the attribute one more time and you’ll see the first manipulator displayed in the cycle—the Rate attribute.
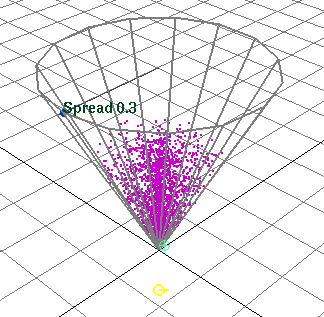
Most attribute manipulators work the same way. Drag the icon away from the emitter icon to increase the value. Drag toward the emitter icon to decrease the value. Attribute manipulators that require different manipulation techniques are described in the following topics.
Note also that the Max Distance and Min Distance dots indicate a range of emission. The two dots originally are superimposed. To improve your view of the dots, drag a dot until the two dots are visible.