A per particle attribute holds the attribute values for each of an object’s particles. For example, the rgbPP attribute holds the value for each particle’s rgbPP value.
Each particle has a unique numerical particle identifier. A particle’s identifier is stored in a per particle particleId attribute for the particle object. As you create the particles of a particle object, Maya assigns each particle a particleId in sequential order starting at 0.
For example, suppose you use the Particle tool to create a five-particle object by clicking positions in the workspace. The first click of the mouse creates a particle with particleId 0, the second click creates a particle with particleId 1, the third click creates a particle with particleId 2, and so on.
When an emitter emits particles, Maya assigns particleId numbers in sequential order starting with the first particle emitted. The first emitted particle has particleId 0, the second has particleId 1, the third has particleId 2, and so on.
You can assign per particle attribute values to specific particles using the particleId attribute.
Suppose you’ve used the Particle tool to create a grid of nine particles named ColorGrid. In the Attribute Editor, you’ve set the Particle Render Type of the particles to Spheres. You’ve chosen Shading > Smooth Shade All to display the particles with shading.
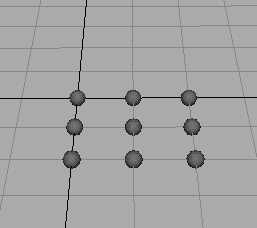
You can give the particles different colors based on their particleId.
To color the particles based on particleId:
This adds a per particle attribute named rgbPP, which controls the red, green, and blue color scheme of each particle.
When the particles are not selected, they turn black after you add the rgbPP attribute. Adding the rgbPP attribute turns off the default coloring of the particles and gives them a value of <<0,0,0>>.
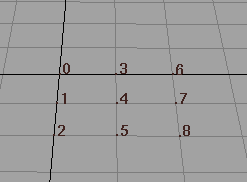
The particleId of each particle is displayed instead of spheres:
if (particleId <= 2) rgbPP = <<1,0,0>>; else if ((particleId > 2) && (particleId < 6)) rgbPP = <<1,1,1>>; else rgbPP = <<0,0,1>>;
The creation expression executes whenever you rewind the animation. The particles don’t show the color assignments yet. The Numeric particle render type ignores color assignments to rgbPP.
The left, middle, and right columns of particles are red, white, and blue:
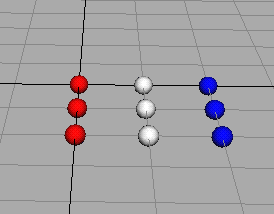
The expression’s first statement assigns a red color to all particles whose particleId is less than or equal to 2. The value <<1,0,0>> is red in the RGB color scheme.
The second statement assigns a white color to all particles whose particleId is greater than 2 and less than 6. The value <<1,1,1>> is white in the RGB color scheme.
The third statement assigns a blue color to all particles that don’t meet the conditions in the prior two statements. In other words, all particles whose particleId is greater than or equal to 6 become blue. The value <<0,0,1>> is blue in the RGB color scheme.
The following steps show another common way to control an attribute based on the particleId attribute.
To color half the particles red, and half the particles blue:
if ((particleId % 2) == 0) rgbPP = <<1,0,0>>; else rgbPP = <<0,0,1>>;
The runtime expression executes each frame as the animation plays. Particles with even-numbered particleIds are red. The odd-numbered particles are blue.

The first statement uses a modulus operator (%) to calculate the remainder of dividing a particleId by 2. It then compares the remainder to 0. If the remainder equals 0, the statement assigns the particle a red color. The value <<1,0,0>> is red.
The second statement assigns a particle a blue color if the remainder of the modulus operation doesn’t equal 0. The value <<0,0,1>> is blue. For example, dividing particleId 0 by 2 equals 0 with remainder 0. Because the remainder is 0, the particle having particleId 0 receives a red color.
Dividing particleId 1 by 2 equals 0 with remainder 1. Because the remainder is 1, the particle having particleId 1 receives a blue color.
Dividing particleId 2 by 2 equals 1 with remainder 0. With remainder 0, the particle having particleId 1 receives a blue color. The expression executes for each particle in the object.
The result is that even-numbered particleIds become red, odd numbered particles become blue.
The creation expression executes. The particles become red, white, and blue as described for the previous expression.
The runtime expression executes each frame. The particles are red and blue as the animation plays.
You cannot assign values to individual particles with the array index notation commonly used in programming languages.
For example, suppose you’ve created an opacityPP attribute for an object made of three particles. You can’t assign values as in this example:
opacityPP[0] = 0.3;
opacityPP[1] = 0.5;
opacityPP[2] = 1;


