


Learning Resources > Tutorials > Getting Started with Maya > Painting > Lesson 3: Painting textures
on surfaces >
Preparing for painting
Warning: Some surfaces have no file texture assigned to the current attribute.
The 3D Paint Tool requires that the material assigned to your model has a file texture applied to it. Because there is no file texture yet assigned, the warning appears.
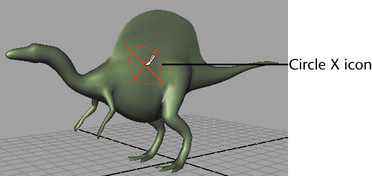
When you move the cursor over Dino, you see a circle-X icon that indicates you cannot paint on the model.
This step and the next two steps assign a texture to Dino. (Note that you can also paint over an existing texture that you assigned from Hypershade.)
By increasing the file texture size, you will see finer detail and resolution in a rendered image of your painting. The number 512 is twice the default size, 256. You could use a higher resolution, but sizes larger than 512 slow the interactive speed as you paint. Notice that Size Y automatically changes to 512. This is because Keep Aspect Ratio is turned on, ensuring that the proportions of the texture are maintained.
Maya creates a file texture and assigns it to the Color attribute of the DinoSkin material. At the end of the lesson you will learn about the name and location of the file texture that is created.