cMuscleSmartCollide node


This is a locator node that draws a plane displaying the guide for the cMuscleSmartCollide deformation feature of the main deformer.

Related topics

Basic attributes

The following are the basic attributes of the cMuscleSmartCollide node:

Enable

Lets you enable or disable a specific cMuscleSmartCollide node while leaving others functional.

Collide Mode

For collision, sets the type of collision that occurs.

plane

This mode is faster, but simply compresses points along a plane.

mesh

This mode is a true mesh-mesh intersection that more accurately moves points in the collision, but is slower.

Axis

Sets the axis along which the cMuscleSmartCollide node is constrained. This is typically set to the Y-axis, assuming your joints have the Y-axis down their length. The node attempts to detect the proper value, but you can adjust this if you require a different result.

Angle Min/Max

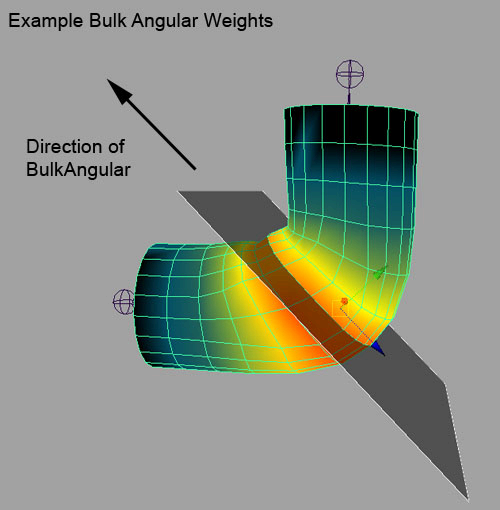
Most weights can be painted entirely around the mesh, but are only driven in the direction at which the joints are coming together. These values set the falloff from this direction of the weights. All points within the minimum angle move fully, falling off to the outer angle. For the smoothest interpolation you can set a 0 to 180 range.

Bias

The cMuscleSmartCollide node is automatically constrained to the two transforms and connected using a cMuscleSmartConstraint node. By default, the rotation of the node is the average of the two joints or transforms. This attribute lets you bias this value towards one joint or the other. Negative values make it orient more towards the A node, and positive values towards the B node.

Bias Adjust

In some cases, you want the node to be split evenly between the A and B joints/transforms, but then as the joints rotate and trigger, you want to adjust the bias. This attribute sets the change in bias to occur as the node is triggered.

User Scale

This attribute can be connected to a master scaling node in your rig in order to allow for scalable rigs.

Manual Scale

Since the movement and other attributes are distance-based, this is another optional scale setting that is a multiplier on these values. For example, rather than setting bulkA to 10, bulkAngular to 10 and so on, you can leave these values at 1 and set Manual Scale to 10. This value gets initialized when the node is created based on the distance of the joints originally chosen.

Smooth-Pre attributes

The Smooth weights and related attributes apply a basic Muscle smoothing effect. Like other weights, these are affected by the angle falloff. Pre-smoothing is applied before the other Smart Collision deformation is applied.

Smooth Iterations Pre

The node can use Smart Smooth weights to compute a pre-smoothing operation on the mesh before the other parts of the deformer occur. This sets how many iterations are done. Values around 0 to 24 are recommended.

Smooth Strength Pre

For Pre-smoothing, sets how strong the effect is.

Smooth Hold Pre

For Pre-smoothing, this sets smooth holding, which causes the points to smooth more or less along their normal. When set to 1, the point is not allowed to smooth along its normal, so it maintains volume but does not smooth as much.

Movement attributes

Bulk A/B

These weights and attributes set how much the mesh moves outwards radially from the A or B joint. The direction is assumed from the joint location, and occurs in the direction that the joints are moving together. This can be useful to imply muscles or volume in the mesh.

Bulk Angular A/B

Angular bulk weights are similar to bulk, but occur in the average direction of the two joints, and thus are the same direction for both the A and B sides. This can be used to fix weights right at the center of the joints, for things like a rubber-hose effect caused by skinning.

Bulk Widen A/B

Widen weights cause the mesh to scale outwards in a direction perpendicular to the bending of the joints. Like other weights, these are scaled by the Angle Min and Angle Max settings.

Slide A/B

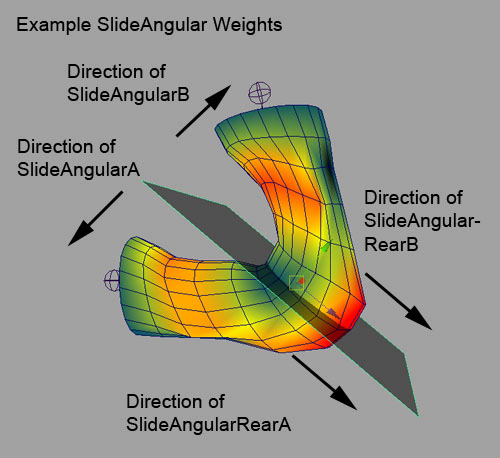
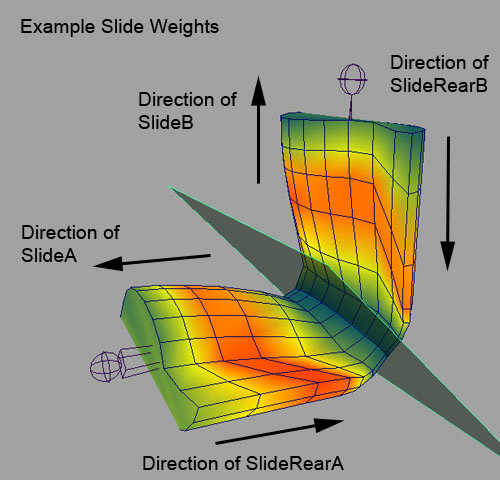
Smart Slide weights cause the painted points to translate away from the center down the length of the joints. The “A” region points move backward and the “B” region points move forward. This can help increase the gap (if desired) at the connection. It can also simulate real skin being pulled along by a muscle. For example, when your wrist bends down, the skin on the bottom moves towards the elbow. You can use sliding weights with positive or negative values on the cMuscleSmartCollide node to get these effects.

Slide Rear A/B

Slide Rear attributes use the same slide weights as the slide attributes, but cause the points on the “back” side of the mesh to move in the opposite direction. Again, this can be used to simulate muscle movement and help skinning. “Slide” moves points on the inside of the falloff angle, slideRear moves points on the outside.

Slide Angular A/B

These weights cause the points to move away from the plane in the direction of the plane normal. This can be used to help compress or expand the area right at the joint location.

Slide Angular Rear A/B

These weights move points outwards along the backwards average direction of the joint angles. This is similar to a reverse bulkAngular and can be used to help simulate elbow protrusions or knuckles.

Wrinkle A/B

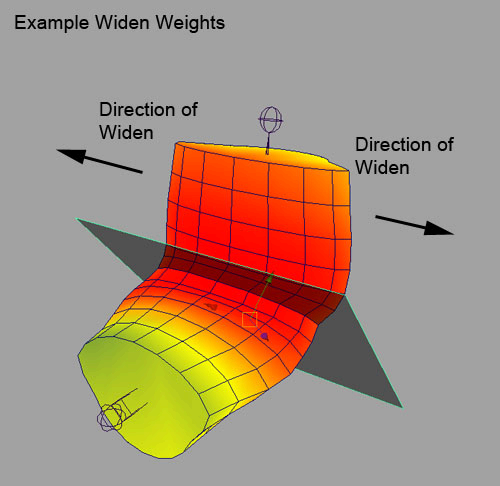
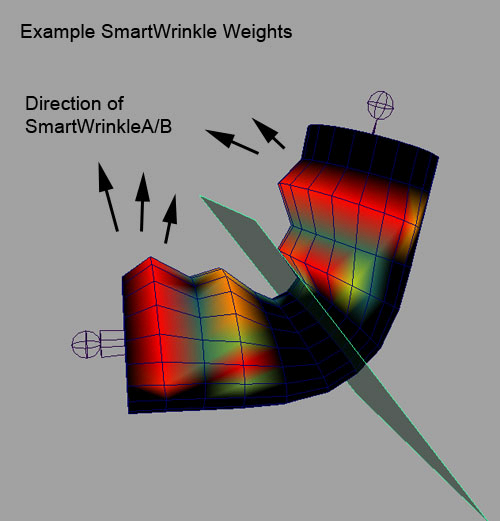
Smart Wrinkle weights move points outwards from the joints, and along their normals depending on the wrinkleSpread attribute. This is a separate and different weight then the Wrinkle weights. Regular Wrinkle weights are a part of the Relax deformation and are applied when points are compressed and Relax mode is used. Smart Wrinkle is a part of the Smart Collision node and deformation, and is applied as the Smart Collide node is triggered.

Wrinkle Spread

Sets whether the wrinkle direction occurs more radially or more from the normal. When set to 0, the wrinkle is more flat around the plane radially. When set to 1, it uses the normal of the point.

Collision attributes

Flatten A/B

Along with Smart Flatten weight, lets you control what parts of the mesh collide and flatten, and the amount of flattening for the A or B points due to self collision. Typically set to 1.0 for the entire area you want the cMuscleSmartCollide node to affect.

Rigid A/B

Sets how rigid the A or B points are. Points that are more rigid move less during self collision.

This lets you set one side to be more or less rigid than the other when colliding happens. For example, if one area is supposed to be harder or less likely to be moved, you can increase the Rigid A or Rigid B values to make that side less moveable during flattening.

Collision Blur Iterations

After a collision has been computed, the motion of the collided points can be blurred out to also affect other points. This can help soften the effect of the collision in surrounding areas.

Volumize A/B

When a collision occurs, surrounding points can be ‘volumized’ or bulged out to preserve volume. Along with Smart Volumize weights, these attributes set the amount of that bulge.

Volumize Offset

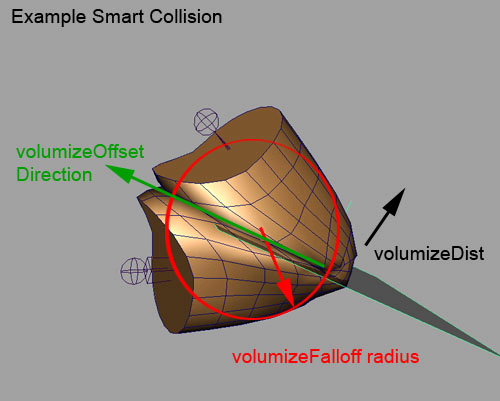
The direction and amount of volumization is based on an implied center point for the collision. This is based at the joint pivot for the B joint, but in reality is typically a certain amount down the length of the joints. This value lets you set the motion/offset of the center of collision as the node is triggered, to slide this internal location and get better volumization effects.

Volumize Puff

Sets whether points are volumized from the collision in a radial fashion or if they expand outwards based on their normal. When set to 0, points are volumized radially so they do not re-collide, when set to 1, points are volumized along their normals.

Volumize Dist

Sets the distance a point can be from the collision/plane and still be volumized. Along with the paintable Smart Volumize weights, this attribute controls the amount of points bulging out due to collision, letting you create a smooth ramp on the points being volumized.

Volumize Falloff

In addition to the distance from plane, this falloff value specifies a spherical 3D falloff from the implied center of collision. Points volumize with less effect falling off at this distance.

Smooth Post attributes

Post-smoothing is applied after the deformation and collision is calculated. These can be used to help smooth out areas for better results before or after the deformation.

Smooth Iterations Post

The node can use Smart Smooth weights to compute a post-smoothing operation on the mesh after the other parts of the deformer occur. This sets how many iterations are used. Values from 0 to 24 are recommended.

Smooth Strength Post

For Post-smoothing, sets how strong the effect is.

Smooth Hold Post

For Post-smoothing, sets smooth holding, which causes the points to smooth more or less along their normal. When set to 1, the point is not allowed to smooth along its normal, which helps maintain volume, but does not smooth as much.

Lock Smart Wt

Used by the Muscle Paint tool to mark whether a node has “HOLD” enabled for weighting. Nodes that have HOLD enabled in the Influence list are locked and cannot have their weights adjusted. This value is not usually edited directly.

Display attributes

Draw

Turns the display of the cMuscleSmartCollide node on or off.

Shaded

Sets the display of the node: wireframe, shaded, or wireframe and shaded.

Highlight

Maya highlights selected nodes in white or green by default. When this value is 1, selected nodes are highlighted the same way. When set to 0, no highlighting occurs, so the node color does not change when selected.

Color

Sets the display color of the node when not triggered.

Color Trigger

As the node gets triggered (as the joints rotate together) the color of the cMuscleSmartCollide node interpolates to this color.

Opacity

Sets the opacity of the plane drawn in the scene view for the node. When set to 1 the plane is solid, when set to 0 it is transparent.

Display Size

Adjusts the display size of the plane. This does not affect actual computations.