Automatic mapping creates UVs for a polygon mesh by attempting to find the best UV placement by simultaneously projecting from multiple planes. This method of UV mapping is useful on more complex shapes where the basic planar, cylindrical, or spherical projections do not produce UVs that are useful, especially on components that project outwards or are hollow in nature.
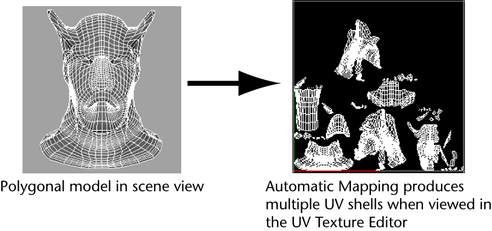
Automatic mapping creates several UV map pieces or shells in texture space. This is fine if you are using tools that deal with UVs automatically for you, such as standard (not combed) fur and the 3D Paint tool in projection mode. If you need to work with the UVs manually, you will need to stitch the UV shells back together in the UV Texture Editor using the Move and Sew UV Edges feature.
You can also specify user-defined planes for the projection of UV texture coordinates. The Load Projection option uses a polygon object you specify from the current scene.
To facilitate more accurate UV projections a projection manipulator is displayed when using the Automatic Mapping feature. The projection manipulator lets you correlate the multiple planar UV projections that occur in the scene view with how the resulting UVs appear in the UV Texture Editor.
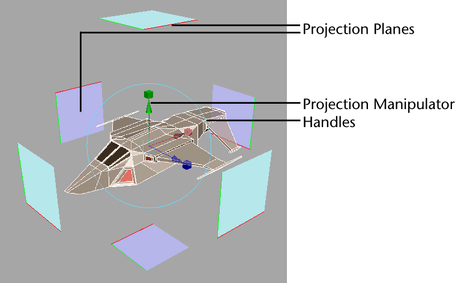
The projection manipulator appears centered about the selected object in the scene view with blue planes that correspond to the number of planes set by the Automatic Mapping’s Planes option. A light blue color indicates that the projection plane is oriented facing away from the selected object, while a dark blue plane indicates the side of the projection plane that is oriented facing towards the selected object.
The manipulator’s planes are displayed semi-transparent at a scale of 50% of the actual projection plane so they don’t fully occlude the object when using the manipulator. Red and green lines appear along the edge of each plane to indicate the corresponding U and V axes within the UV Texture Editor.
You can move, rotate, and scale the UV projection manipulator just like other manipulators in Maya. Scaling the manipulator affects the resulting scale of the projected UVs in the UV Texture Editor.
You can reset any transformations for the projection manipulator using the Channel Box. When a custom projection object is specified using the Load Projection option, the projection manipulator gets updated to reflect the planes specified by the custom projection.
To map UVs for a polygon object using Automatic Mapping
When you project the UVs they will appear in the UV Texture Editor’s 2D view.
 .
.
The automatic mapping projection manipulator appears centered about the object in the scene view with blue projection planes that correspond to the Planes setting you specified. That is, if the Planes option was set to 4, then 4 planes appear on the manipulator.


