Show in Contents

Add to Favorites

Home: Autodesk Maya Online Help

Set Driven Keys overview

Set Driven Keys

Use the Graph Editor and Dope Sheet

Set a driven key relationship
To
link two attribute values
- Select
Animate > Set Driven Key > Set.
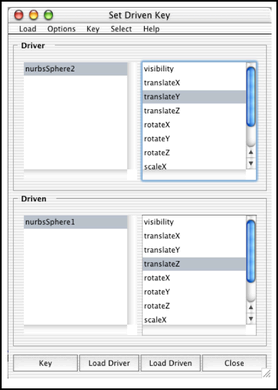
The Set Driven Key window
appears.
NoteIf you select an object before making the
menu selection, the Set Driven Key window lists
and selects it as the driven object by default.
- In
the scene view, select the driver object.
- In
the Set Driven Key window, click
the Load Driver button.
The object and its attributes appear in the Driver section
of the window.
- In
the Set Driven Key window, select
an attribute from the driver.
This attribute will drive the attribute that
is selected from the driven object.
- In
the scene view, select the driven object.
NoteThe driven and driver objects can be the
same object.
- In
the Set Driven Key window, click Load
Driven.
The object and its attributes appear in the Driven section
of the window.
- Select
the driven attribute.
- In
the Channel Box or elsewhere, set
values for the driver and driven attributes.
- Click
the Key button in the Set
Driven Key window.
Maya creates a key that links the selected attributes
at the current values. The object with the driven attribute turns
magenta in the workspace. The color indicates that the object has
a driven attribute.
- Set
new values for the driver and driven attributes.
- Click Key again.
Maya creates a key that links the attributes
at their new values. You can link the attributes with as many keys
as necessary. The default interpolation between the keys is linear.
To fine tune the relationship between the driver attribute and driven
attribute, use the Graph Editor.
You
can also examine the state of objects at their driven
keys. This is helpful when you’re editing the Graph
Editor curve or setting more driven keys.
To
view driven objects
- In
the scene view, select the object with the driven attribute.
- From
the Set Driven Key window, select Key
> Go To Next or Key > Go To Previous.
With these menu items you can loop through all
the keys for the driven attribute and view the state of the object
at each of these keys.
To
list the keyable or nonkeyable attributes for an object in the Set
Driven Key window
- Select
the object in the scene view or Outliner.
- Do
one of the following:
- To
list keyable attributes, turn on Options > List Keyable
Attributes for driven in the Set Driven Key window.
- To
list nonkeyable attributes, turn off Options > List Keyable
Attributes for driven in the Set Driven Key window.
- Click Load
Driven.
The Set
Driven Key window displays the keyable or nonkeyable
attributes for the object. You can use the Channel
Control editor (
Window
> General Editors > Channel Control)
to control whether an attribute is keyable or nonkeyable.
To
add an object to the existing Driver or Driven list
- Select
the object in the scene view or Outliner.
- In
the Set Driven Key window, turn
off Options > Clear On Load.
- Click Load
Driver or Load Driven.
The current object is added to the Driver or Driven list.
To
load the driver linked to a loaded driven object
- Select
the driven object in the scene view or Outliner.
- Click Load
Driven.
- In
the Set Driven Key window, select Load
> Current Driver.
The driver of the current driven object appears
in the Driver list.
To
load only shape nodes for an object
- Select
the object from the scene view or Outliner.
- In
the Set Driven Key window, turn
on Options > Load Shapes.
- Click Load
Driver or Load Driven.
Only the current object’s shape node appears
in the Driver or Driven list.
