Proxy references let you substitute different files in the scene that have been previously organized within a proxy set. You must have an existing file reference in order to add one or more corresponding proxy references to the proxy set. An example of a generalized proxy workflow is provided below:
Example 1: Creating proxies for a file reference
For example, if you have a full resolution version of your scene, you can create simpler, lower resolution copies of this scene. That is, the copies could contain identical content with identical naming structures, but have simplified versions of the objects. As a result, you might have three versions of the scene: a high resolution version called Scene_HiRes.ma, a medium resolution version called Scene_MedRes.ma, and a low resolution version Scene_LowRes.ma.
In this example, when you add the file Scene_MedRes.ma as a proxy, ensure you apply a proxy tag named MedRes.
You can load or unload multiple proxy references in the scene simultaneously by selecting the multiple file references within the Reference Editor, and then select the appropriate proxy tag name (provided you have been consistent with your proxy tag naming).
The next example shows you how to add a proxy reference using the Reference Editor, identify it with a unique tag, and then load it into the scene.
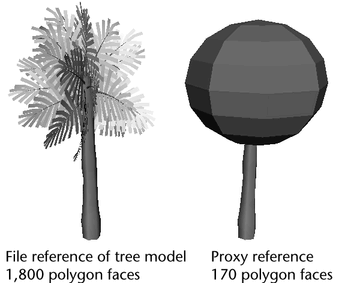
A scene contains a file reference to a scene containing a tree model. The referenced tree will be substituted with a simpler proxy reference.
Example 2: Adding and loading a proxy reference
 .
.
The file browser appears showing the current default project scene directory (or the last directory that was accessed by the file browser when referencing a file).
The proxy file is added to the list of available proxies within the proxy set and the loRes proxy tag is applied. This is indicated by the icon in the Reference Editor. The proxy file will not appear in the scene until you load it.
Maya updates the file reference by loading the treeSimple proxy reference (tagged loRes) into the scene.


