Once you’ve shattered your object, you can move the shards with the move tool and keyframe the motion, or you can connect the shards to a Dynamics field and let the field move the shards.
To connect rigid body shards to fields
To connect soft body shards to fields
If you want all the shards to be affected by the field, you must select the particle shape for each shard.
Link original surface to shards
When you turn on the Link to Shards option, Maya makes several connections from the original surface to the shards. This option lets you control the visibility of the original surface and the shards with one attribute on the original surface’s transform node.
When you use the Link To Shard option, a Shatter attribute is added to the transform of the original object. The Shatter attribute toggles the visibility of the shattered surface with the visibility of the original surface. When the Shatter attribute is on, the shattered object is visible. When the Shatter attribute is off, the original object is visible. Shatter is turned on by default when you create the shatter so you can see the shattered object.
If you have selected rigid bodies with collisions off as the post-operation, and turned on Link To Shards, the shatter node is parented to the original object and the Shatter attribute is connected to the active/passive attribute of the rigid body.
If you’ve turned on the Make Original Surface Rigid option, the Shatter attribute is also linked to the Ignore attribute of the original rigid body. When the Shatter attribute is turned on, the Ignore attribute of the original object is also turned on. This causes the original surface to be ignored in the rigid solver and prevents the original surface from influencing any other rigid body once the shatter object is visible.
When the Shatter attribute is turned off, the shards become passive rigid bodies. When shatter is on, the shards become active rigid bodies so fields will affect them. You can use this to create an object that shatters when it hits a surface.
To shatter a rigid body on impact
This sets it to the universal collision layer that allows it to collide with every rigid body.
 .
.
The original object becomes visible and an active rigid body.
The shattered object becomes visible and the shards become active rigid bodies.
If you have selected a soft body post operation, and turned on Link To Shards, the shatter node is not parented to the original object. The Shatter attribute is added to the original object’s transform node and controls the visibility. When the Shatter attribute is turned on, the shattered object is visible. When the Shatter attribute is turned off, the original object is visible.
A goal weight attribute, which controls the goal weights of the soft body particle shapes, is also added to the transform of the original object. This “control” goal weight is in addition to the goal weight that is added to the particle shape of the shard.
When the Shatter attribute is turned off, the goal weight of the particle shape of the shards is set to 1.This causes the shattered object to follow the goal object, which is a copy of the original surface, when it is not visible. When the shatter attribute is turned on, the shattered object becomes visible and the goal weight of each of the particle shapes is set to the value of the “control” goal weight attribute of the original surface. These attributes are connected with an expression.
You can use this to create a soft body that explodes.
.
The shattered object becomes visible and the shards become active rigid bodies.
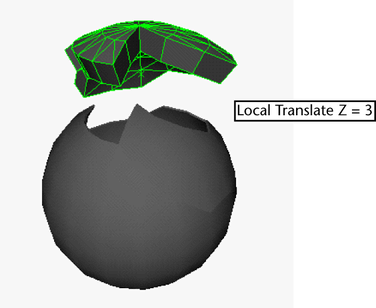
Change the extrusion value of a shard
Once you’ve created a shatter with an extrusion, you can change the extrusion value for all the shards or for individual shards using the Local Translate Z attribute of the shard shape.
If you haven’t created the shatter using an extrusion, an extrusion node is not connected to the shards.
Set goal weights on soft-body shards
The goal weight influences how much a soft body follows the goal object. You can set the goal weight to a value between 0 and 1. A value of 0 means that the goal’s position has no effect on the soft body. A value of 1 moves the soft body to the goal object position immediately.
Values between 0 and 1 cause the soft body to move toward the goal as if bound to it by an elastic spring. The closer to 1, the greater the influence the goal object has on the position of the shards. The goal weight value is 0 by default, which means the goal’s position has no effect.
When you select a post-operation option that creates a goal weight but you don’t turn on Link to Shards, a goal weight attribute is not created on the original shape. The goal weight is an attribute of the particle shape so you must select the particle shape in each shard of the shatter node to display the goal weight attributes.
To set the goal weight on soft-body shards with goals
To set the goal weight on shards with soft-body lattices and goals


