


Edit Mesh > Append
to Polygon Tool
Lets you add polygons to an existing mesh using a polygon edge as a starting point.
Edit Mesh > Append
to Polygon Tool > 
These are the options for the Append to Polygon Tool. You can set these options before you create your polygon, or change the options as you work.
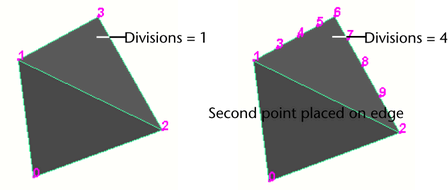
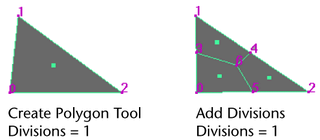
Specifies the number of vertices to be added along the edges of the polygon being appended. The default is 1. Extra vertices are placed along the edges to create the subdivisions making the polygon multi-sided.
The following example shows the appended polygon subdivided with a setting of 4.
This option is only available while you are placing vertices for the appending polygon. Use the slider to rotate the new points before you complete the append operation.
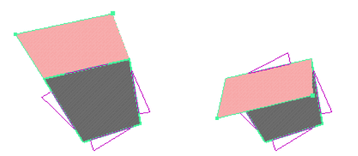
The newly created face rolls around the first edge you selected. If all the edges can be set on a hinge, the face turns around the reference line. If the edges you select are not aligned, the face will not turn around this reference line.
By default, any faces you add using the Append to Polygon tool lie in the same plane as the polygonal mesh you append to. Turn off Keep new faces planar if you want to append polygons in another plane.
Texture space
Specifies how UV texture coordinates (UVs) are created for the appended polygon. Three settings are possible: None, Normalize, and Unitize.
When Normalize is selected, the texture coordinates are scaled to fit into the 0 to 1 range of the UV texture space, maintaining the original shape of the UV face. For more information see Edit UVs > Normalize.
When Unitize is selected, the texture coordinates are placed on the corners and boundary of the 0 to 1 texture space. A polygon with three vertices will have a triangular UV texture map (with sides of equal length), while a polygon with more than three vertices will have a square UV texture map. For more information see Edit UVs > Normalize.
These additional attributes are specific to the polyAppend node and can be edited from within the Attribute Editor.
These values represent the position of the vertices you placed when appending to the polygon. For example, if you placed three vertices (as in the example of the Attribute Editor), only three sets of values display. Change these values if you want to move the vertices and change the shape of the appended polygon.
