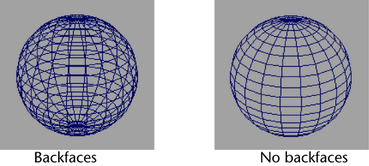
Display > Polygons


Backface Culling

Draw only what is facing the camera in the 3D view in the wireframe mode. You can improve performance on some systems by turning on Backface Culling. Select one of the following options:

Off

By default, Maya turns backface culling off. All wireframes are shown.

On

Surfaces appear invisible in areas where the normal points away from the camera.

Culling Options

Select one of the following culling options.

Keep wire

Displays wireframe outlines.

Keep hard edges

Sets backface culling for soft edges only.

Keep vertices

Displays vertices.

Vertices

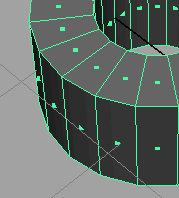
Show vertex points on the selected polygons.

Vertex Size

Adjusts the size that vertices are drawn in the scene view. The default size is 3. The range is from 0.2 to 10.

UVs

Show UV texture coordinates (UVs) on the selected polygons.

Unshared UVs

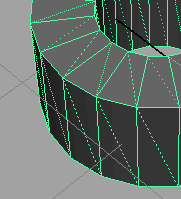
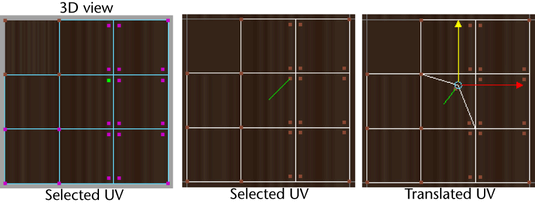
Show the UV texture coordinates (UVs) on your object.

If UVs are shared, they display as single purple dots.

If the UVs are not shared, multiple purple dots display close to the vertex to which a given UV belongs. When you select the UV in the UV Texture Editor, a line displays pointing to the face it belongs to.

Turn on the Unshared UVs option to display and be able to select unshared UVs.

UV Size

Adjusts the size that UV texture coordinates (UVs) are drawn in the scene view and the UV Texture Editor. The default size is 4. The range is from 0.2 to 10.

Component IDs

Display index numbers on an object’s vertices, edges, faces or UVs, depending on which component types you select. The numbers for UVs only appear in the UV Texture Editor.

Face Normals

Show perpendicular lines (normals) of each face of the polygon.

Vertex Normals

Show perpendicular lines (normals) of each vertex of the polygon. Vertex normals only appear on selected objects.

Tangents

Displays lines on the mesh indicating the tangent and binormal directions. Binormals appear in a blue color. Tangent normals appear in a red color.

Normals Size

Adjust the length of the normals by entering a value or using the slider to specify a size. The range is from 0.2 to 10.

Standard Edges

Display all edges in default settings.

Soft/Hard Edges

Show dotted lines as soft edges and solid lines as hard edges.

Hard Edges

Show only hard edges (soft edges are invisible).

Border Edges

Highlights all border edges (only in the Texture Editor).

Crease Edges

Turn on or off the crease edges on polygons.

Texture Border Edges

Turn on or off the texture border edges.

Edge Width

Adjust edge width by entering a numeric value or using the slider to select ranges of 0.02 to 10.

Face Centers

Show a small square to indicate the face center.

Face Triangles

Show all polygon faces as triangles.

Non-planar Faces

Highlight all non-planar faces.

Reset Display

Restore default settings.

Limit to Selected

Limits the changes that you make to the selected polygons. To apply display changes to all polygons, turn off this option.

Custom Polygon Display

Using the Custom Polygon Display window, you can set how specific components of your polygons display. This dialog box provides a way to set multiple options also available in the Display > Polygons menu, and compatibility with previous versions of Maya.

Objects affected

Determines the objects affected by the settings you apply in this window.

Vertices

Allows you to display vertices and vertex normals on polygons.

Same effect as the Display > Polygons > Vertices and Display > Polygons > Vertex Normals options respectively.

Highlight

Same effect as Display > Polygons > Crease Vertices.

Vertex Size

Same effect as Display > Polygons > Vertex Size.

Edges

Allows you to customize the display of edge hardness.

Same effect as Display > Polygons > Standard Edges, Display Polygons > Soft/Hard Edges and Display > Polygons > Hard Edges.

Highlight

Allows you to highlight Border edges, Texture Edges and Crease edges.

Same effect as Display > Polygons > Border Edges, Display > Polygons > Crease Edges and Display > Polygons Texture Border Edges respectively.

Edge width

Same effect as Display > Polygons > Edge Width.

Face

Allows you to display face centers, face normals and non-planar faces.

Same effect as Display > Polygons > Face Centers, Display > Polygons > Face Triangles and Display > Polygons > Non-planar Faces respectively.

Show item numbers

Allows you to display the ID for each vertex, edge, face and UV.

Same effect as the options in Display > Polygons > Component IDs.

Normals size

Adjusts the length of normals when they are displayed.

Same effect as Display > Polygons > Normals Size.

UV Size

Adjusts the size of UVs.

Same effect as Display > Polygons > UV Size.

Texture coordinates

Allows you to display UVs individually or as a topology on objects at all times.

Same effect as Display > Polygons > UVs and Display > Polygons > Unshared UVs respectively.

Color operations

When Color in Shaded Display is on, you can see the effects of Apply Color, Prelighting, and the Paint Vertex Color Tool while in shaded mode. This option is turned on by default whenever you select these commands. Select a Color Material Channel to refine your application. See Coloring polygons for details about using these options and the Apply Color operation.

Backface culling

Same effect as Display > Polygons > Backface Culling.

Smooth Mesh Preview

Allows you to quickly see what meshes will look like when they are smoothed.

Same effect as pressing 2 on your keyboard.

Display

Allows you to display both the original mesh (as a cage) and the smooth mesh at the same time, or just the smooth mesh.

Edit

Allows you to choose whether you want to edit the original version, the smoothed version, or both versions of your mesh simultaneously.

Only available when Display is set to Cage + Smooth Mesh.

Division Levels

Determines the number of concurrent smooth operations shown in the scene panel.

Extra controls

A number of extra options for Smooth Mesh Preview. For more information on these controls, see Mesh > Smooth.