


Learning Resources > Tutorials > Getting Started with Maya > Maya Basics > Lesson 2: Creating, manipulating,
and viewing objects >
The Toolbox:
Transformation tools
You need to move the base slightly upwards in the Y direction so it is positioned on the X, Z plane. To do this you use the Move transformation tool located in the Toolbox.
The upper half of the Toolbox contains the tools for transforming objects (selection, move, rotate, scale) within Maya. When you move your mouse cursor over any transformation tool icon you see the name of the tool appear next to the mouse cursor.
![]()
The tool’s name also appears in the Help Line at the bottom of the Maya window. The Help Line has an additional purpose: it displays summary instructions as you use tools that require several steps.

Selection and de-selection of objects
Before you can transform an object, you must ensure it is selected. You can select objects by clicking them directly, or by dragging a rectangular bounding box around some portion of the object to indicate what you want selected. To deselect an object, you simply click somewhere off of the selected object.
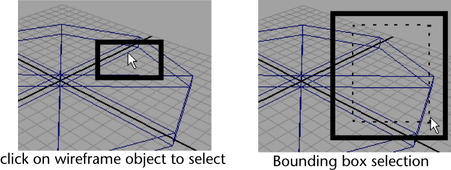
To select the base primitive object in the scene view
The object is selected when its wireframe outline color displays in a bright green color. If it is not selected, its display color is navy blue.
To use the Move Tool to adjust the position of the base
A move manipulator icon appears over the primitive cylinder in the scene view.
The Move Tool Manipulator has handles that point in the direction of the three fundamental axis directions of 3D space: X, Y, Z. The handles are colored red, green, and blue based on their function related to the X, Y, Z axes and control the direction of the movement along an axis.
When you click a specific handle, it indicates that the move is constrained to that particular axis direction.

The base cylinder now needs to be rotated slightly so the front of the base is parallel to a grid line. Since each facet of the octagon represents 45 degrees of a circle, you need to rotate the object approximately half of that amount or 22.5 degrees.
To use the Rotate Tool to adjust the position of the base
A rotate manipulator icon appears over the primitive cylinder in the scene view.
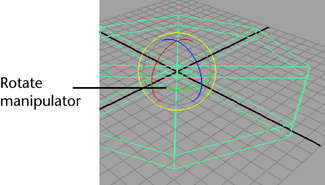
The Rotate Tool manipulator consists of three rings (handles), plus a virtual sphere enclosed by the rings. The colors of the handles correspond to the X, Y, and Z axes. The handles are colored red, green, and blue based on their function related to the X, Y, Z axes and control the direction of the rotation around an axis.
You are rotating the cylinder around its Y axis.
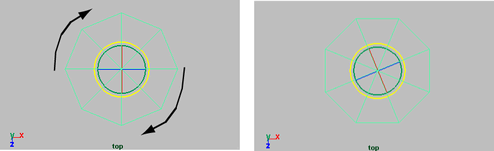
You may be asking yourself the question “How do I know if I’ve rotated the base exactly 22.5 degrees?” You can check the accuracy of the rotation by viewing the Channel Box. Rotate Y should be close to 22.5 degrees.
To undo an action select, Edit > Undo, Redo, Repeat. Maya allows you to perform multiple undos.