What are the components
of a fluid?
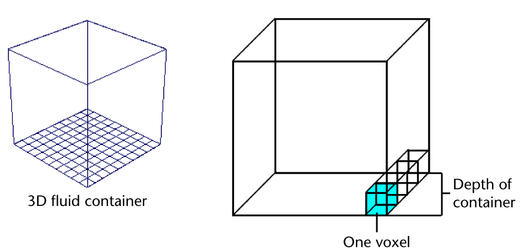
A fluid container is a rectangular 2D or 3D boundary that defines the space in which the fluid exists. Fluid effects cannot exist outside a container. The fluid container is the principle component for any dynamic or non-dynamic fluid effect. Open water effects do not require containers. For details, see Open water effects.
Fluid containers are divided into three dimensional grids, and each unit of one of these grids is called a voxel.
When you first create a fluid container, it’s empty. To create a fluid effect, you need to add contents to the container and then modify the look and behavior of the fluid by modifying the container attributes. See Defining the contents of a fluid container.
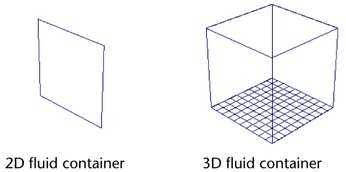
3D fluids can be very large, making the solve for their dynamic fluid behavior very slow. This is due to all the extra data required to define them. In many cases, the effect you want can be achieved using simpler, less memory intensive 2D fluids.
For information on creating fluid containers, see Create fluid containers.
For information on modifying fluid containers, see Modifying fluids.
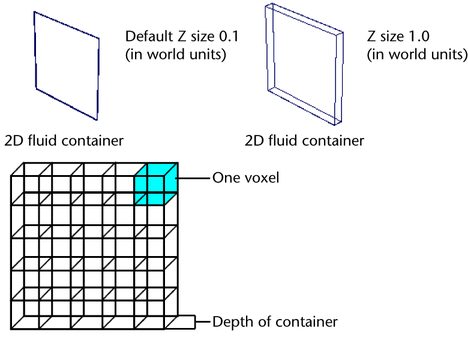
A 2D fluid container is a 3D fluid container with a depth of one voxel. The size of that voxel is determined by the Z size of the container.
As the Z size gets bigger, any Density in it becomes more opaque. By animating the Z size you can mimic the 3D effect of an object moving through the fluid without the extra rendering time it would take to have a full-fledged 3D fluid.
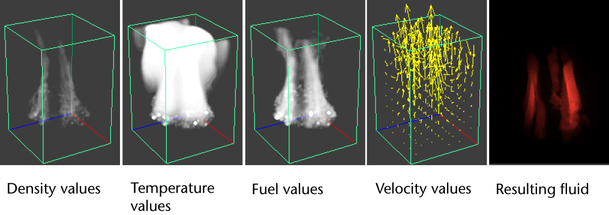
You can add fluid properties (Density, Temperature, Fuel, and Color) to a fluid container using a fluid emitter. A fluid emitter creates fluid property values and populates the voxels of a grid with those values as a simulation plays. The fluid emitter must be within the bounds of the fluid container to emit.
You define a fluid effect by putting values for any or all of the following fluid properties into its container: Density, Velocity, Temperature, Fuel, and Color.
You can use different methods to define these properties, depending on the effect you want and whether the effect is dynamic or non-dynamic. See Defining the contents of a fluid container.
Density represents the material property (the substance) of the fluid in the real world. Think of density as the geometry of the fluid. Where the Density values are highest, the Density appears more opaque. You can create a non-dynamic fluid effect using only Density, or you can combine Density with Velocity and other properties to create dynamic simulations.
Velocity affects the behavior of dynamic fluids by moving Density, Temperature, Fuel, and Color values inside the container. Velocity has both magnitude and direction values. Direction defines the moving fluid values’ path.
For dynamic simulations, Maya calculates the Velocity values based on the forces you apply to the simulation. However, you can also set a fixed Velocity path, using Velocity as a force to push property values around in the container.
For dynamic fluids, Fuel combined with Density creates a fluid where a reaction can take place. Density values represent the substance being reacted, and Fuel values describe the state of the reaction. Temperature can ignite Fuel to start a reaction (for example, an explosion effect). During the course of the reaction, the Density and Fuel values get smaller until the reaction is complete.
Combining fluid properties to create dynamic effects
While non-dynamic effects only use properties defined as gradient or static grid (the values cannot change), dynamic effects combine fluid properties defined by gradients with fluid properties defined by dynamic grids.
For example, you could set Density to use a Dynamic Grid, but add a constant Velocity in a single direction to affect the movement of the Density. The magnitude and direction of the Velocity would remain unchanged as the simulation progresses, but the Density values would change as a result of the solving.