Show in Contents

Add to Favorites

Home: Autodesk Maya Online Help

Remove colors or prelighting from polygon vertices

Working with color per vertex data

Transfer color data between meshes

Create and edit color sets
You can use color per vertex sets to switch
between, merge, blend, or globally modify the colors stored on your
polygonal meshes’ vertices.
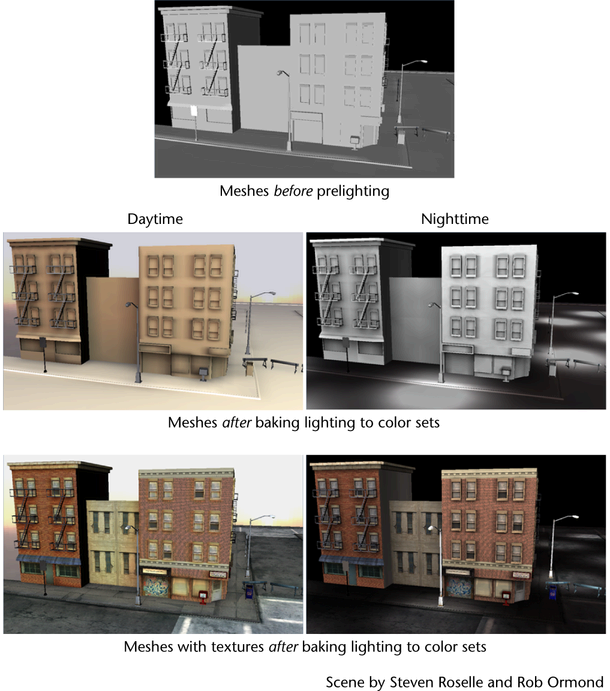
For example, you can
pre-light your scene by baking your daytime lighting to one color
set and then your night time lighting to another color set for each
polygonal mesh in your scene. For more information on prelighting,
see
Prelighting polygons.
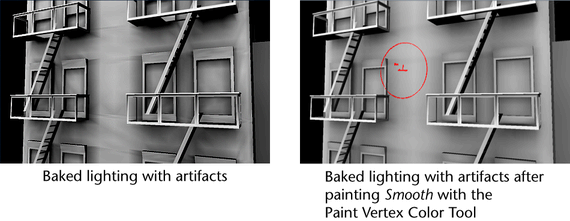
You can also touch up
your baked lighting results by painting vertex colors directly into
your color sets. The Paint Vertex Color Tool lets
you remove, replace (darken or lighten), or smooth the lighting
baked on your vertices. See
Assign colors to polygon vertices by painting.
In addition to storing
baked lighting data, you can use color sets to do the following:
- Add black and white values to your mesh
to represent bump.
- Use painted vertex colors in place of
blocking volumes. For example, you can set up your game engine so
that characters are allowed to walk where vertex color values are
painted white, and characters can't walk where vertex color values
are painted black.
- Pass data on to a game engine, where
it can be used to define rules or constraints. For example, to draw
areas where characters are allowed to walk. This data is not used
in Maya, so is similar to blind data associated with polygons. See
What is blind data? in
the Polygonal Modeling guide.
You can modify existing
baked CPV color sets globally with the Modify feature
using either an HSV attribute modifier or an RGBA color channel attribute
modifier. The Modify feature creates a polyColorMod node
downstream from the CPV color set.
The Modify feature
is useful when you need to globally modify an existing color set
and don’t want to bake the color and lighting for the object again. The Modify feature
is also useful when you want to modify existing color sets to match
particular gamma requirements of some computer and interactive games
platforms. For more information, see
To globally modify an existing color
set.
To create a color set
- In the scene view, select the polygonal
mesh for which you want to create a color set.
- In the Polygons menu set, select one
of the following:
The Color Set Editor appears.
- In the Color Set Editor,
click New.
A new color set is created
for the selected mesh.
To rename an existing color set
- In the scene view, select the mesh whose
color set you want to rename.
- Do one of the following:
- In the Channel Box,
select the color set you want to rename.
Select
Color > Rename Current Color Set.
- In the Color Set Editor,
select the color set you want to rename.
Click the Rename button
or double-click on the color set.
The Rename
Color Set window appears.
- Press the
 key
to delete the color set’s current name, type in a new name, and
then click OK.
key
to delete the color set’s current name, type in a new name, and
then click OK.
The selected color set
now has the new name you specified.
To delete a color set
- In the scene view, select the mesh whose
color set you want to delete.
- Do one of the following:
- In the Channel Box,
select the color set you want to delete.
Select
Color > Delete Current Color Set.
- In the Color Set Editor,
select the color set you want to delete.
Click the Delete button
or press the key
on your keyboard.
The selected color set
is deleted and removed from the editor and the Channel
Box.
To merge color sets
- In the scene view, select the mesh whose
color sets you want to merge.
- In the Color Set Editor,
select the first color set you want to merge and then
 -click
the other color set with which you want it to merge.
-click
the other color set with which you want it to merge.
You can only merge or collapse one
color set onto another at a time. Also, merges occur from top to
bottom.
- Click the Merge button
in the Color Set Editor.
The two color sets you
selected are merged using the Over blend
style option; a blendColorSets node is created
for the new color set which replaces the original sets. The new
color set is given the same name as the first color set that was
selected.
NoteYou can change a
merged color set’s Blend Style from its blendColorSets node
in the Attribute Editor.
To blend between color sets
- In the scene view, select the object
whose color sets you want to blend.
- In the Color Set Editor,
select the first color set you want to blend and then -click
the other color set you want in the blend.
You can only blend two
color sets at a time. Also, blends occur from top to bottom.
- Select a blend style from the blend drop-down
list located under the Blend button.
See
Blend.
- Click the Blend button
in the Color Set Editor.
The two color sets you
selected are blended from top-most to bottom-most selection. This
blend uses the specified Blend Style.
A blendColorSets node is created
for the new color set that is created. By default, the blended color
set is named blendedColorSet in the Color
Set Editor window.
To
globally modify an existing color set
- In the scene view, select the object
whose color set(s) you want to modify.
- In the Color Set Editor,
select the color set you want to modify and then click the Modify button.
A polyColorMod node
is created for the selected color set and the Attribute
Editor displays with the polyColorMod node
tab selected.
- Modify attributes for either the HSV
color modifiers or the RGBA color channel modifiers and notice the
change to the color set on the object in the scene view.
NoteThe polyColorMod node
is created downstream from the existing CPV color set node. You
should use the Modify feature late in your
production pipeline only after your CPV color assignments and light
baking are complete.
The color modifications
you make on the polyColorMod node are cumulative.
Normally, you should apply color modifications to either the HSV global
modifiers or the RGBA color channel modifiers.
Notes:
- The display of Color Per Vertex (CPV) Material
Blend Settings varies depending on scene view Shading settings.
In textured and shaded mode with Hardware Texturing enabled, Add, Subtract and Multiply blend modes
will be displayed with slightly reduced quality. The correct result
of all blend modes will be displayed by switching to High
Quality Rendering mode (Renderer > High Quality
Rendering) with Hardware Texturing (Shading
> Hardware Texturing) enabled. If your graphics card
does not support High Quality Rendering mode,
you can test render using the Hardware Renderer to
preview your result. In instances where your graphics card may not
support High Quality Rendering or the Hardware
Renderer, you can switch to Hardware Shaded mode
(press 5 on your keyboard) to preview the blending without textures.