Render the scene using
raytracing
To better understand the differences between caustics versus other lighting, you begin by rendering the scene using the mental ray for Maya renderer without using Caustics.
You start by preparing the scene and then rendering. In this section you:
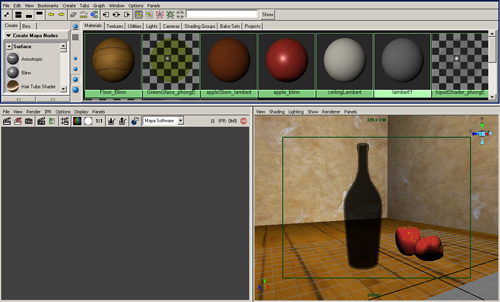
Setting a panel layout for rendering
Producing a rendered image usually requires that you render test images to achieve the final result. This may involve adjusting many render quality, shading, and lighting settings. Opening and closing the various windows can become tedious.
Keeping the most frequently used windows and panels open allows you to work more efficiently.
In the following steps, you select a panel layout to work more efficiently with the various panels and windows.
In this lesson, you learn how the bottle’s shadow can be made to appear more realistic as a result of the caustics.
To turn on shadows for the spotlight
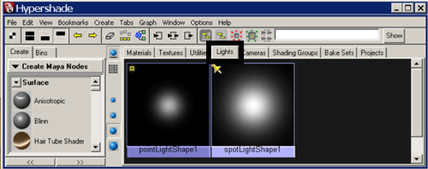
The Hypershade displays icons for the two lights in the scene.
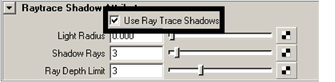
When you render the scene, shadows are cast by the spotlight.

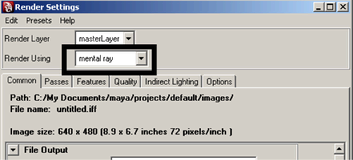
Using the mental ray for Maya renderer
To use the Caustics feature in Maya you must render using the mental ray for Maya renderer.
To turn on the mental ray for Maya renderer

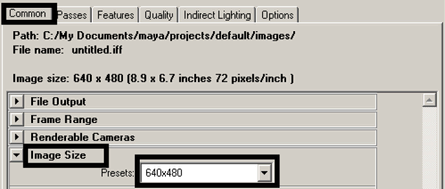
Setting the image size for rendering
You set the size that an image will be rendered in the Render Settings window. For this lesson, you render the image at a size that allows you to evaluate the caustic effect.
Setting render presets for raytracing
For the first rendering, you render the scene to see how the shadows appear without using caustics.
To set Render options for raytracing
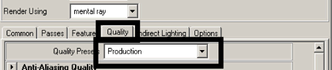
The Production preset ensures that the refraction level settings (found in Raytracing Quality section) are at a level high enough to render objects with translucency (for example, the bottle). The Production preset also sets the anti-aliasing level for the image.
When you render an image, all of the objects, lighting, shading materials, and image quality settings are used to calculate the image, from the camera’s view.
To render an image using mental ray for Maya

The bottle scene renders using the mental ray for Maya renderer and the image appears in the Render View window.
.
Keeping the image allows you to compare it to any subsequent test renders. In this lesson you compare each successive rendered image to the previous one to observe how the changes you make to render settings affect the rendered image.
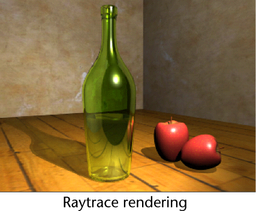
The rendered image shows the following:
In the next section, you turn on the caustics rendering attributes and render the scene.