You can blend nCache clips to create smooth, seamless transitions between your object’s overlapping cache clips.
nCache clips are blended automatically. By default, all the overlapping regions of your enabled nCache clips are automatically blended together using their cache clip’s current weight settings. See Input Weights.
nCache weights are normalized between overlapping cache clips. So if two overlapping cache clips have the same weight values (i.e. 1.0 and 1.0, 0.5 and 0.5 and so on), then they will both equally contribute to the simulation in their cache blend regions on playback.
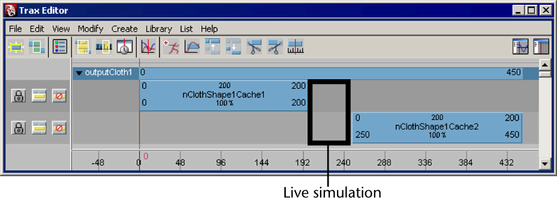
You can adjust the smoothness of your cache clips’ blends by adjusting their weight settings, or by manipulating their weight curves. For example, if you have two overlapping cache clips, one from frames 0-200 and the other from frames 100-300, and both their Input Weights are set to 0.5 (50%), then both cache clips equally contribute to their object’s deformations from frames 100-200 during playback.

Sequential cache clips are not blended. When there are gaps between your nCache clips, they are filled with the live playback of your object’s original (source) simulation—not interpolated cache data.
Create and adjust nCache clip weight curves
You can create weight curves for your nCache clips. These weight curves let you adjust how your nCache clip’s simulation ease in and out of their blend regions.
To create and adjust nCache clip weight curves
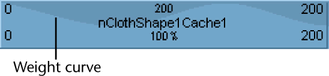
All the current object’s caches appear as clips in the track view.
 -click
the cache clip and select Create Weight Curve from the
context-sensitive menu that appears.
-click
the cache clip and select Create Weight Curve from the
context-sensitive menu that appears.
 ).
-click
the selected cache clip and select Graph Weight from the
context-sensitive menu that appears.
).
-click
the selected cache clip and select Graph Weight from the
context-sensitive menu that appears.
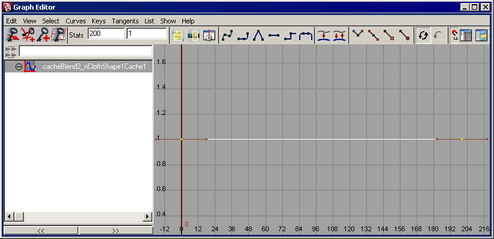
The Graph Editor opens with the selected cache clip’s weight curve framed in its graph view.
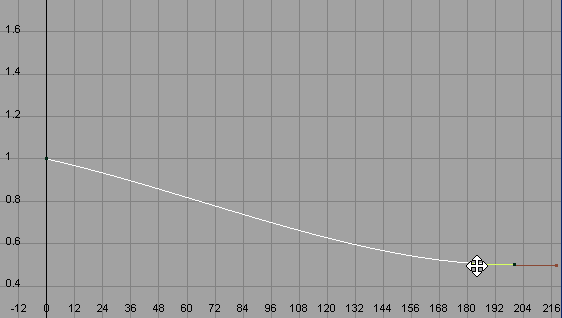
Select the Move
Tool from the Maya toolbox, and  -drag the
keys or their tangent handles to change the shape of the weight curve.
-drag the
keys or their tangent handles to change the shape of the weight curve.
Select the Insert
Keys Tool (  ) or Add
Keys Tool (
) or Add
Keys Tool (  ) from
the Graph Editor’s toolbar, and -click
the weight curve to add additional keys to the weight curve.
) from
the Graph Editor’s toolbar, and -click
the weight curve to add additional keys to the weight curve.
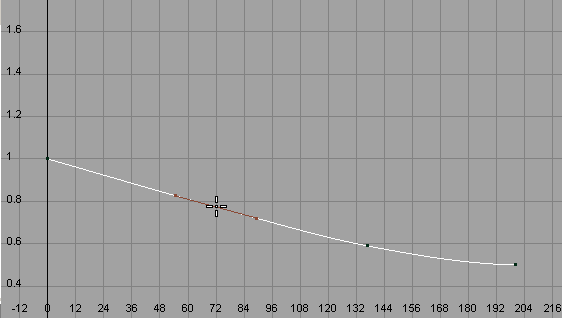
You can then use these new keys and their tangent handles to further manipulate the shape of the weight curve.
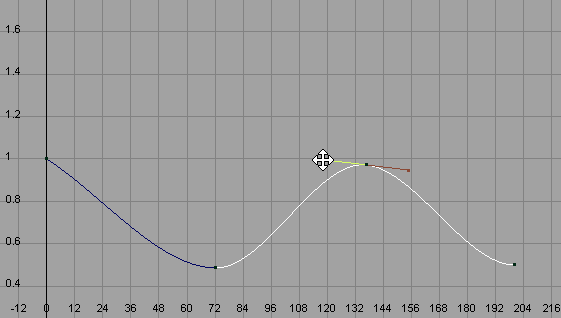
The modified weight curve now appears on the selected nCache clip in the track view area.
Blend and set the weighting of nCaches from the Attribute Editor
Blend nCaches and set their weights
If an object has more than one nCache attached to it, then a cacheBlend node is automatically created to define and manage the weighting of the object’s multiple nCaches. See cacheBlend.
When nCaches overlap in time, their overlapping cache regions are automatically blended together using the caches’ current Input Weight values on their cacheBlend nodes.
Also, cache weights are normalized between overlapping caches. So if two overlapping caches have the same weight values (i.e. 1.0 and 1.0, 0.5. and 0.5 and so on), then they will both equally contribute to the simulation in their cache blend regions on playback.
To blend nCaches and set their weights
When an nCache’s weight is 1.0, it is blended with the current object’s other caches and it fully contributes to the object’s cloth effects during playback.
When an nCache’s weight is 0.0, it is not blended with the current object’s other caches and it does not contribute to the object’s cloth effects during playback.
After you adjust each
cache’s weight value, -click
on their weight attributes and select Key Selected from
the context-sensitive menu that appears.
This adds keys to your nCaches, creating weight curves. You can then manipulate these weight curves to smooth the transitions between your object’s overlapping (blended) caches.
You can interactively apply, distribute, and blend the weights of multiple caches on a single nCloth object by painting your nCloth object’s cache weights directly on its surface. This allows you to direct and manipulate the weights of an nCloth in an artistic fashion. For example, with the Paint Cache Weights Tool you can paint one cache on the sleeve of an nCloth jacket, paint another cache on the main body of the nCloth jacket, and then blend the two caches at the jacket’s shoulder to create a smooth transition from the sleeve’s nCloth cache to the main body of the jacket’s nCloth cache.
The Paint Cache Weights Tool settings appear in the Tool Settings window. See nCache > Paint Cache Weights Tool.
For descriptions of these tool settings, see Artisan Tool Settings in the Artisan guide.


