Choosing a coordinate system
for the Move Tool
Use the Tool
Settings window to specify the coordinate system (Move
Axis) for the Move Tool.
- Object
-
Moves an object in object
space coordinate system. Axis orientation includes rotations on the
object itself. If several objects are selected, each object moves
the same amount relative to its own object space coordinate system.
- Local
-
Aligns the object to
the rotation of the parent object. Movement is constrained to those
axes in the local space coordinate system. The object is aligned
to the rotation of the parent object and does not include the rotations
on the object itself. If several objects are selected, each object moves
the same amount relative to its own object space coordinate system.
- World
-
Moves in the world space
coordinate system. The object is aligned to the world space axis. This
is the default.
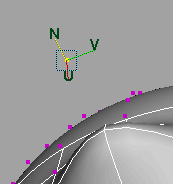
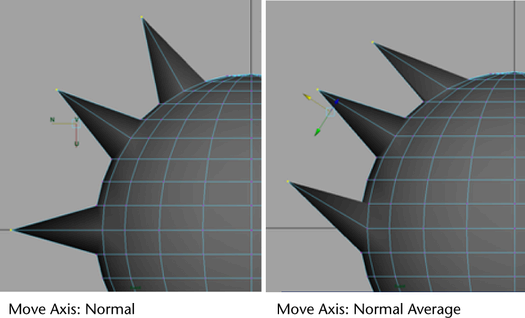
- Normal
-
Moves selected vertices or CVs
in the U or V direction of the surface. Typically you would use this
option for small sets of CVs. The manipulator indicates the surface
Normal, U, and V directions.
When you select Normal,
the Update [UVN] Triad check box appears. Turned on, this option causes
the manipulator orientation to reflect the moved surface rather
than the original surface. This is the default. Turned off, the
manipulator retains the orientation for the original surface.
- Along Rotation Axis
-
Aligns
to the Rotate Tool’s axes on the object. If you have
set the Rotate Axis in the object’s Transform
Attributes to a different value (which offsets the orientation
of the object relative to the orientation of the object's local
rotation axis) this attribute will have an affect; otherwise, Along
Rotation Axis is the same as Object.
- Normal Average
-
Moves selected vertices
or CVs along the average of their combined normals.
- Along Live Object Axis
-
(This setting does not
work with Reflection on.) Sets the Move
Tool to move objects along the axis of a live object.
Most commonly, you would make a construction plane live, but any
object can be set live. When you have a live object and select this
option, the move arrows of the Move Tool align
to the live construction plane. (The geometry of the live object
doesn’t matter; the move aligns to the axes of the live object.)
- Custom Axis Orientation
-
Enter the x, y, and z
offset of the custom axis in radians.
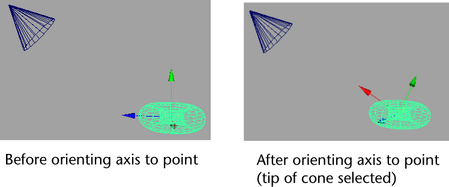
- Set to Point
-
You can set the Move
Tool to move the selected object along a axis defined
by selecting a point.
To set a point in order to change the
move axis
- Select an object.
- Click Set to Point.
- Select a point in the scene. It can be
a point on any object, including the currently selected object.
The axis of the Move
Tool changes.
You can see the new axis
settings in the three boxes under Custom Axis Orientation.
- Set to Edge
-
You can set the Move
Tool to move the selected object along an axis defined
by an edge.
To set an edge in order to change the
move axis
- Select an object.
- Click Set to Edge.
- Select an edge in the scene. It can be
an edge on any object, including the currently selected object.
The axis of the Move
Tool changes.
You can see the new axis
settings in the three boxes under Custom Axis Orientation.
- Set to Face
-
You can set the Move
Tool to move the selected object along an axis defined
by a face.
To set a face in order to change the
move axis
- Select an object.
- Click Set to Face
- Select a face in the scene. It can be
a face on any object, including the currently selected object.
The axis of the Move
Tool changes.
You can see the new axis
settings in the three boxes under Custom Axis Orientation.
- Preserve Child Position
-
When this option is selected, moving
a parent object does not move its children.
- Preserve UVs
-
When this option is selected,
moving components in the scene view causes the corresponding UVs
to move accordingly in the UV space. The net result is that the
texture does not become warped.
- Discrete Move
-
The Discrete
Move setting enables the Relative option
and lets you specify the amount an object is moved in increments
(determined by the Step Size value).
- Relative
-
While Maya moves the
object, relative spacing is maintained. Turn this option off if
you don’t want to preserve relative spacing while translating.
- Step Size
-
Enter a value to determine
the amount an object is moved in increments when the Discrete
Move option is selected.
Move Snap Settings
The following settings
let you snap to polygon face centers and vertices while translating.
- Retain Component Spacing
-
Turned on by default.
This means that while Maya moves the component, relative spacing
is maintained. Turn this option off if you don’t want to preserve
relative spacing while translating and snapping polygonal components.
- Snap to Live Polygon—Face
Center or Vertex
-
These settings let you
move and snap to a live polygon’s components (face centers and vertices).
To snap to components on a live polygon
- Select the polygon you want to snap to
and click the Make Live icon on the Status
Line
 .
.
- Double-click the Move icon from the Tool
Box to open the Tool Settings window
 .
.
- In the Tool Settings window,
select a Snap to Live Polygon setting—Face Center or Vertex.
- Click the object you want to move and
use the center Move manipulator handle to
drag. The movement is restrained to the nearest face centers or vertex
locations of the live polygon.
NoteThe arrow manipulator
handles do not restrain movement.