Asset Editor


Window > General Editors > Asset Editor

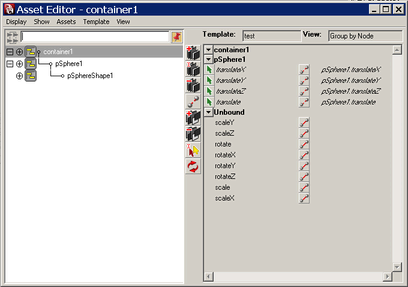
The Asset Editor displays asset information in a two panel window. The left panel shows scene containers in an Outliner view, while the right panel shows published attributes and nodes.

The Asset Editor has two modes of operation. In Select Container mode, you can quickly traverse from container to container and show individual container’s node contents and attributes.

In Edit Container mode, you can publish or unpublish attributes in the left panel and bind and unbind attributes in the right panel.

You can switch between these modes by selecting a container and clicking the Pin icon .

In the left panel, a selected attribute appears highlighted and. In the right panel, a selected attribute appears with an arrow icon.

Related topics

Outline (Select Container mode)

To... Do this
Switch to Edit Container mode Select a container in the left panel, then click the Pin icon .
Expand or collapse the level under a node

Click the plus or minus icon next to the node’s name.

Expand all levels under a node

+ click the plus icon next to the node’s name.

Show or hide the attributes on a node

Click the plus ( ) or minus ( ) icon next to the node’s name.

You can further expand multi-value attributes.

Re-order nodes in the hierarchy

-drag the node to a new place in the hierarchy.

Move a node from one container to another

-drag the node in one container onto another container.

Make a node a child of another node

-drag the node onto the node you want to be its parent.

Search for a specific node Enter the full or partial name of the node you are sourcing for in the text field and press .

Outline (Edit Container mode)

To... Do this
Publish an attribute

In the left panel, select the attribute you want to publish, then click the Publish icon or Publish As icon .

Unpublish an attribute In the left panel, select the attribute you want to unpublish and click the Unpublish icon .
Assign a template Select Template > Assign and choose a template from the list that appears or select Assign New Template and select the container from the file browser.
Save the published attribute names of the pinned container as a template Select Template > Save As and enter a template name and location.
Select an attribute Select the attribute’s name in the left panel, or click the box next to its name in the right panel.
Bind/Unbind an attribute Click the Bind icon or Unbind icon next to the attribute’s name in the right panel.
Rename an attribute Select the attribute and click Rename.
Add a view to the current template With a template currently loaded, select View > Add.
Change the order of nodes in the Group by Node View mode Change the order of the nodes in the left panel or the Outliner and refresh the right panel by clicking the Refresh icon ( ).
NoteYou can select multiple published names or attributes by + clicking them.

Asset Editor buttons

Asset Editor buttons control how attributes are published or bound.

Pin/Unpin Container

Pins a selected container for editing. The Asset Editor changes to Edit Container mode, and only the selected container displays in the left panel. Its published bound and unbound attributes display for editing in the right panel.

Click the icon again to unpin the currently selected container and return to Select Container mode. When in Select Container mode, all containers display in the left panel while the right panel is empty.

Select

Selects a published name in the right panel. The select icon appears in three colors.

Green indicates the published name comes from the assigned template.

Yellow indicates there is a template assigned to the container, but the selected published name does not originate from it.

Red indicates there is no template assigned to the container.

Publish

Publishes the selected attribute to the lowest level container that encapsulates it. The attribute is bound to a default published name that matches the attribute name.

If an identical published name already exists on the container, your new published name will have a number appended to it.

Publish As...

Publishes the selected attribute to the lowest level container encapsulating it. The attribute is bound to a published name of your choice.

Unpublish

Unbinds the selected attribute from its published name and removes the published name from the container. You can only unpublish attributes whose names are not derived from an assigned template.

Unbind selected

Unbinds all selected published names from their corresponding attributes.

Publish Name

Creates a published name on the container without binding an attribute to it.

Unpublish Name

Removes a published name from the container.

You can only remove published names that are unbound and do not originate from an assigned template.

Rename Published Name

Renames a published name.

You can only rename published names that are unbound and do not originate from an assigned template.

Refresh

Updates the right panel.

Bind / Unbind

Binds or unbinds the selected attribute from its corresponding published name.

Asset Editor menu bar

For information on the Display and Show menus, see the Outliner.

For information on the Asset menu, see Assets.

For information on Transfer Attribute Values, see Edit > Transfer Attribute Values.

Template menu

The Template menu in the Asset Editor gives you all of the options for creating and assigning templates to your containers. After a template is assigned to a container, the container is referred to as an asset.

NoteThe Template menu is only available when you pin a container to switch to Edit Container mode. See Pin/Unpin Container.

The Template menu contains the following options:

Assign

Lets you select and assign a template to the pinned container. See .

Unassign

Breaks the association between the pinned container and its assigned template. See Un-assign a container template.

Save

Saves the published names from the pinned container to the template file. See Save a container template.

NoteTo prevent other users of your template from overwriting the template file using Template > Save, it is recommended that you write protect your template files.
Save As

Lets you create a new template of published names from the pinned container. See Create a container template.

Reload

Reloads the assigned template. See Reload a container template.

View menu

The View menu in the Asset Editor gives you all of the options for creating customized container layouts.

Before working with views, you must create a template for your container. For more information on creating container templates, see Create a container template.

After you add a view to the template, you can edit the template file to change the view layout. For more information on customizing views, see Customize a template view.

NoteThe View menu is only available when you pin a container by clicking to switch to Edit Container mode. See Pin/Unpin Container.

The View menu contains the following options:

Mode

Lets you select from two default layouts, or use a custom view layout of the asset’s attributes. Select from the following options:

Flat

Displays the container’s published attribute names in a list. This is a default view that does not use the template.

Use Template

Displays the container’s published attribute names based on its current template. When Use Template is selected, you can select a custom view from the View > Name menu item.

Group by Node

Displays the container’s published attribute names in groups based on the node to which they are bound. This is a default view that does not use the template.

Name

Lets you select from a list of available template views. This option is only available when the View Mode is set to Use Template.

If the template has no views defined, or if you set the Name to None, the published attributes display in the order they are defined in the template.

Add

Adds a new view to the assigned template based on default options. The new view is named viewName by default. See Add a view to a container template.

Add >

Opens the Add View Options dialog box letting you select from the following options for adding a view. See also Add a view to a container template.

Name

Lets you enter a name for the view. This is the name that will display in the View > Name list in the Asset Editor and in the View Name field in the Attribute Editor.

Sync container to template

When on, Maya adds to the template any published names from the container that are not yet saved to the template. Any added names are included in the new view.

Save Template

When on, the template is saved to the template file on disk with the new view included. When off, the new view is added internally, but the template file is not saved.

Switch to new view

When on, the right panel of the Asset Editor will update to display the asset with the newly created custom view organizing the published attribute names.

Expand Compounds

Sets whether compound attributes are included in the view definition as individual entries. This affects how the view will display the attributes in Maya’s windows and editors.

When on, child attributes are included in the view individually, and they will display with independent interface controls.

For example, individual sliders and value fields will display for translateX, translateY, and translateZ.

NoteIf you want only the individual child controls to display (without the parent group controls,) you can edit the view definition in the template file, then reload the template. See Customize a template view and Reload a container template.

When Expand Compounds is off, child attributes are not individually listed in the view. The parent attribute (with its children) is displayed using a group control.

Layout Mode

Lets you select Flat or Group by Node as the original layout of published names in the new view.

After the view is added to your template, you can edit the template to change its layout. See Customize a template view.