Show in Contents

Add to Favorites

Home: Autodesk Maya Online Help

How the solver computes a solution

Solving

Review the Locator Summary

Evaluate a solution
Typically,
the solver first produces rough solutions and then more and more refined
solutions as you make improvements.
To
evaluate a rough solution
- Start by
noting the Overall Pixel Slip on the Solve control
panel.
To determine the success of a solution, the
solver calculates pixel slip, which is the distance in pixels between
the track point and it’s locator. The average pixel slip for all
points on all frames appears in the Overall Pixel Slip field.
To see the average pixel slip for any given
frame, refer to the Frame Pixel Slip field. This
value is useful if you suspect certain frames have problems.
NoteAdding track points and survey constraints
may increase the Overall Pixel Slip by a small
amount.
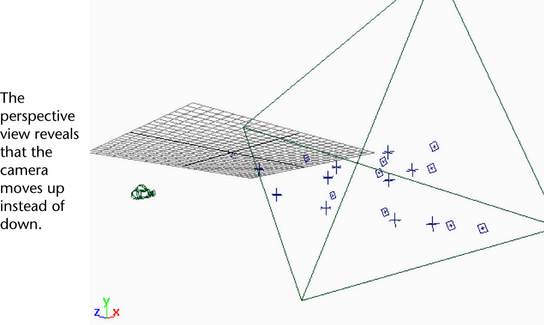
- Look
in the perspective view to check relative 3D locator placement and camera
or object movement.
Locator positions should have the right shape relative
to each other and the camera movement. Scale and orientation to
the world grid do not necessarily matter. Later, you can scale and
register the solution to the grid using survey constraints.
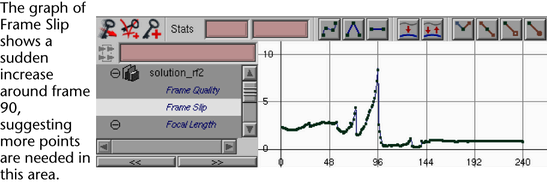
- Examine the solution curves in the Graph
Editor panel.
Look for unusual, unrealistic changes in the
curves and dramatic differences in the range of values.
- Check
the Locator Summary panel for 3D
locators with mostly yellow or red in the quality graph. (For details
on reading this panel, see
Review the Locator Summary.)
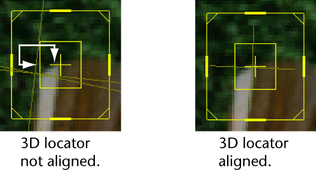
- For
points with low locator quality, look in the shot camera view to
check alignment of track points with 3D locators.
Check only root frames; the other frames may not
match. (However, solutions generated by Solve and Finish do apply
to all frames.)
Once you have a close solution, you should look
for any jumps or jitter. Use the following steps. Also repeat the
same steps for evaluating a rough solution, if needed.
To
evaluate a refined solution
- Try
importing or creating a 3D object in the scene to use as a reference.
To import, select
File > Import.
To create an object, use one of the primitive geometry tools on
the shelf.
- Play
a movie of the solution with any of the following methods:
- Click
the Playblast button on the Solve control
panel to open a movie player window.
- Use
the playback buttons at the bottom of the Maya window, provided you
have set aside enough memory cache in the Setup control
panel. See
Set up image cache for
more information.
- For
the best, most accurate evaluation of a solution, render a sequence
of frames, composite the images and their matte information, and
then record it onto Zap!iT or another digital disk recorder.