General guidelines
- You can create survey constraints
at any time, provided you have track points. However, we recommend
first obtaining a proximate solution before adding constraints.
- The
number of survey constraints varies depending on which constraints are
appropriate for the shot. Typically, shots require no more than
seven to eight constraints, but there are no limits to how many
you can add.
- It’s
okay to estimate constraint distances or coordinates if you are
using a limited number of constraints. (There is also a Variance setting
you can use to allow the solver some leeway.) However, we recommend
using accurate measurements from the set if you create multiple
constraints.
- Where
you place survey constraints is important. Refer to
Placement of Plane and Point constraints for
more information.
- Adding
constraints slows performance of the solver, but there is less of an impact for Registration only
constraints.
- You
can adjust the colors used for the objects that represent constraints. See
Use the Track Display panel.
To
create survey constraints
- Open
the Solve Survey control panel.
- Select
track points as you would any Maya object. (Do not select the associated
3D locators—only track points.)
Typically, you select in the shotCamera panel
or through the Outliner (listed under clip1TrackedPointVisibilityGroup
> clip1TrackedPointGroup).
- Choose
the constraint you want from the LiveConstraints pull-down menu
or hot box menu (press spacebar).
NoteYou can also choose a constraint from the Constraint
Type pull-down in the Solve Survey control
panel. If you do, you must also click Create.
The constraint appears as an object in the view
panels:
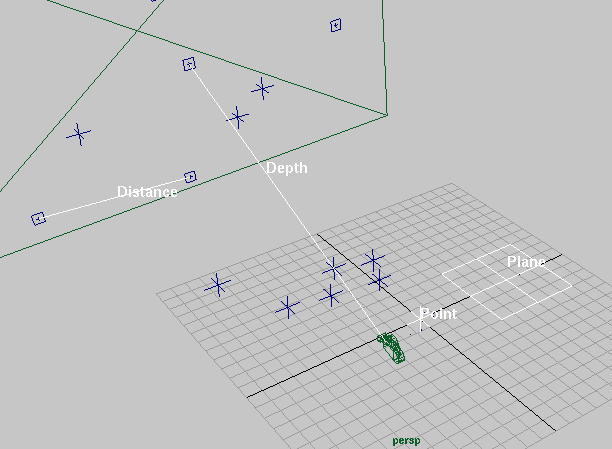
- Set
the constraint’s length or location in the 3D coordinate system.
| Constraint |
Settings |
| Point
|
Use the perspective view or Channel box to
orient and translate the constraint object. You may want to use
the Maya snap tools to lock it onto a model.
|
| Distance
|
Enter the value in the Survey control
panel.
|
| Plane
|
Use the perspective view or Channel box to
orient and translate the constraint object. Refer to
Placement of Plane and Point constraints for
more information.
|
| Depth |
Enter the value in the Survey control
panel.
|
- Optional:
Modify the Variance setting if you want
to allow some leeway for the solver to vary from the constraint
settings.
Follow these steps to incorporate your constraints
into an existing solution. Otherwise, you can start the solver again
to create a new solution.
To
apply survey constraints to a solution
- Open
the Solve control panel.
- Select
the current solution you think is best.
- Click
the Register or Refine button.
Register applies the constraint to the whole
solution. Refine incorporates the constraint into the shape of the
solution.
Placement of Plane and Point constraints
Plane constraints
extend infinitely beyond the plane that represents them. Therefore,
you can move the nurbs plane object anywhere along the plane you
want to constrain.
Make sure you place constraints relative to
each other as they were in real world space. For example, Plane constraints
for a floor and a wall should be perpendicular. Also keep in mind
that the distance you use between parallel Plane constraints
implies a distance constraint.
If you use Point constraints
in combination with reference geometry, use the Maya snap tools
to help you place the geometry into the scene.
Modify survey constraints
You can modify the
values of constraints at any time. However, once the constraint
is created, you cannot add or remove affiliated points. You must
create a new constraint that has the desired points and delete the
old constraint.
NoteIf you delete a track point used in a survey
constraint, Live forces the constraint
to be inactive. You may need to recreate the constraint in this
case.