Show in Contents

Add to Favorites

Home: Autodesk 3ds Max FBX Plug-in Help

MotionBuilder and Maya scaling

Unwanted scaling in 3ds Max

Scripting for the 3ds Max FBX Plug-in

Revit scaling
Similar issues occur with Revit as Revit System
units are Feet/Meters and 3ds Max System units are inches by default.
If you import an FBX file from Revit that uses “Imperial: Feet”
as System units into 3ds Max while the 3ds Max default units are
inches, the FBX conversion scales all objects in the scene during
the import process.
The Revit scale is 12.0
(or 12 inches per foot). This is because, if the scaling did not
occur, your units would become one foot = one inch which would then
create distortion in any bitmap used in the scene.
For example, if you do
not scale objects upon import, a Revit imported house ends up with
walls that are 12 inches long, instead of 12 feet long. The FBX conversion
scaling is also done to ensure that bitmaps are mapped properly in
size in relation to the objects in the scene. If your wall is 12
feet long, it has to be converted to 144 inches long for the bitmap
used to display in an appropriate real-world scale.
If you want to exchange
FBX files between 3ds Max and Revit, change your System unit settings
to feet to match Revit, or you can change the Revit units to match
the 3ds Max System units.
NoteWe do not recommend
that you change the FBX Revit Import preset Units setting in the
so that the scale units are feet instead of inches. It is true that if
you do this, you create a 1:1 match for objects and avoid any scaling
conversion. However, if you change the Revit Preset units setting
so that no conversion is performed, all units become non-real-world
and then materials do not render at the right scale.
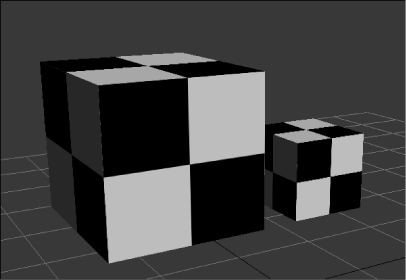
If you want to see the
bitmap scaling issue, you can do the following in 3ds Max:
- Open a new scene in 3ds Max, and create
two cubes.
- Scale one of the cubes by 200%.
- Apply a standard material with a checkerboard
procedural pattern in the diffuse map channel to each cube and make
sure that the Real-world Scale option is activated for both the
material and primitives.
The checkered map is
scaled as well.
Revit workaround
If you do not want to
change the 3ds Max default System units, there is another work-around
for this scaling problem; manually convert every object to real
world scale after you import the file into 3ds Max. If you do this,
you must have Inches set as System units, which is the 3ds Max default.
- Import your FBX file into 3ds Max Design
using Inches as System units.
- Select any of the objects in the scene
and verify their scale: 1200%
- Apply a Standard material with a check
pattern in the diffuse map channel to any object in the scene.
- Create a cube primitive and apply the
new material to that object as well. It is apparent that the mapping
is not the same scale.
- In the Material editor, in the Checker
Procedural Map coordinates rollout, ensure that real-world scale
is active, and adjust the size 48 value to 4 for both Width and
Height.
Note4 is 48 divided by
12, which compensates for the 1200% scaling.
- Do this for every object in the scene
and the mapping appears identical.