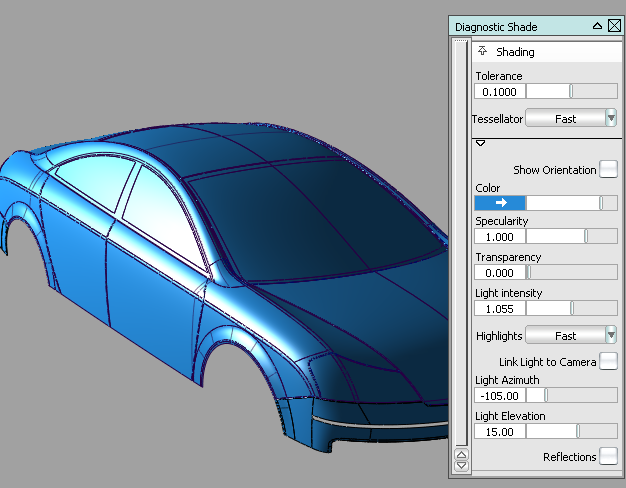
You can now rotate the light and see the shading update interactively when using the following diagnostic shading tools: Multi Color, Random Color, Horizontal/Vertical, and User Defined Texture.
In Multi Color and Random Color, the Lock Light Position checkbox has been replaced by a Link Light to Camera checkbox with the reverse logic. It is checked on by default, replicating the previous default behavior of linking the light to the camera position.
Horizontal/Vertical and User Defined Texture also have this checkbox, which is a completely new feature for these modes. Previously, there was no way to even unlink the light from the camera position.
Un-checking the Link Light to Camera checkbox locks the light at the current camera position and display two sliders, Light Azimuth and Light Elevation, that let you rotate the light.

Azimuth values will range from -180 degrees to 180 degrees and will rotate the light horizontally.
Elevation values will range from -90 to 90 degrees and will rotate the light vertically.
The center of rotation is calculated at the moment Link Light to Camera is checked off. It corresponds to the tumble center used when tumbling with Alt + Shift + left mouse button (with Tumble Center set to World Point in View > World Move Camera >Tumble).

Multi Color shading with light located at camera position.

Multi Color shading with light azimuth = -105.0 and light elevation = 15.0.
Checking on Link Light to Camera again re-links the light to the camera position. The sliders are hidden once more and their values reset to zero.
This implementation gives you the ability to manipulate the diagnostic shading light without exiting your current tool.
Since diagnostic shading modes can now be dragged to a shelf with customized settings (see Ability to drag diagnostic shaders from Control Panel), you can set the light position independently for each of the four modes: Multi Color, Random Color, Horizontal/Vertical and User Defined Texture.