Use the Curves > New Curves > New CV Curve or Curves > New Curves > New Edit Point Curve
 tools to draw curves by clicking to place CVs or edit points.
To set what parameterization and degree the curves you draw will have, open the tool’s option box and set the Knot Spacing and Curve Degree options.
.
See Use the mouse and keyboard in tools.
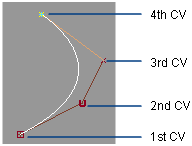
For a degree 3 curve (default), the curve will only appear after 4 CVs have been placed.
The general rule is that a curve of degree m requires m+1 CVs before becoming visible. To see the curve sooner, turn on Progressive Degree in the option box.
The first CV in the curve is shown as a square and the second as a “U” instead of a cross. This helps show the direction of the curve.
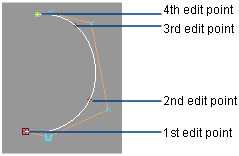
Draw curves by placing edit points
.
See Use the mouse and keyboard in tools.


 tool.
tool.