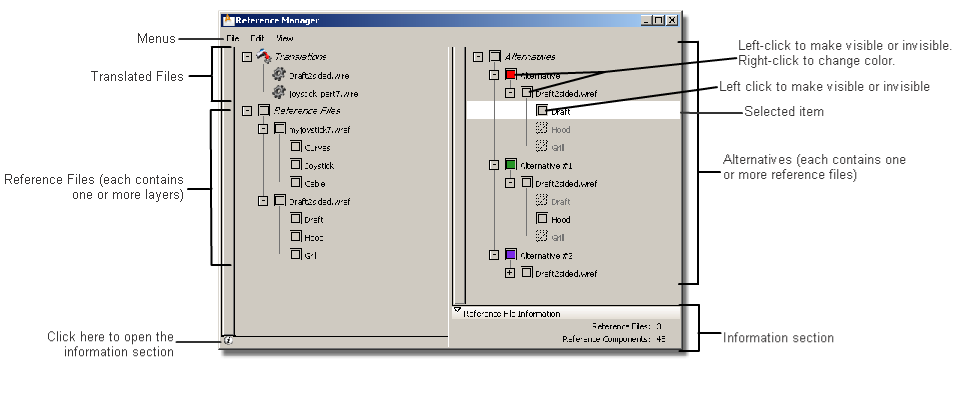
Use the Reference Manager to import reference data for use in two major workflows:
- Importing large amounts of engineering data while maintaining interactive performance.
- Importing large amounts of design data and providing alternative shading and comparisons for design reviews.
The advantages over using stages are loading speed and additional functionality. The following tools work on reference data:
- Diagnostic Shading
- Hardware Shade
- Transparency
- Visual cross sections
- Measurement locators between reference data and real geometry data
To open the Reference Manager
To convert an existing file to a reference file
- Choose from the Reference Manager window.
- Set the translation options in the option box then click .
- Select the geometry file in the browser and click .
The translated file is placed in the sub-folder under the current project and has a .wref extension. It also appears in the Reference Manager window.
Note
You can translate several files at a time by selecting them in the browser. A progress bar is displayed over each file name
in the Reference Manager window as it is translated. To cancel the process, right-click the file name.
To import a reference file
- Choose from the Reference Manager window.
- Select the .wref file in the browser and click .
The reference data appears in blue in the view windows.
To create Alternatives
- Select one or more files in the Reference Manager window. (You can use the
 (Windows) or
  (Mac), or
  key to add to the selection.)
- Do one of the following:
- Choose .
- With the middle mouse button, click and drag the selected file(s) to the right hand side of the Reference Manager window,
and drop in an empty location.
Note
You may have to choose to see both sides of the window.
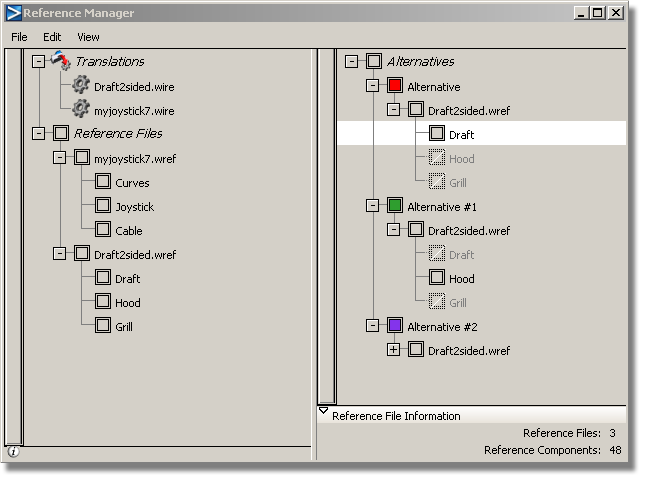
Copies of the reference files are created and appear on the right side of the Reference Manager window under an group. Alternatives are labeled Alternative, Alternative #1, Alternative #2, and so on. If no reference files were selected, the Alternative will be empty.
The new alternative is selected in the view windows. You can transform it, shade it, and hide/show some of its files of file
layers. This allows you, for example, to display different versions of a part located in separate layers of a reference file
by creating three alternatives of it and showing/hiding different layers in each.
To rename an Alternative
- Double-click the Alternative’s name.
- Type the new name and press
 (Windows) or
  (Mac).
To add a reference file to an Alternative
- With the middle mouse button, click the reference file in the left side of the window, and drag it to the Alternative label
on the right side of the window.
A red outline appears around the Alternative label.
- Drop the file by releasing the mouse button.
The reference file is added to the Alternative.
To delete a reference file from an Alternative
- Right-click the file under the Alternative.
- Choose from the drop-down menu.
The reference file is removed from the Alternative.
To delete a whole Alternative
- Right-click the Alternative
- Choose from the drop-down menu.
Note
To delete several alternatives at once, select them in the Reference Manager then choose in the window’s tool bar.
To select reference data and Alternatives
- To select a whole reference file, alternative, or layer, click it in the Reference Manager window.
- To select individual objects, choose and pick the objects in the view windows. The option box lets you pick the reference data at different levels: , , , or . For you can choose to pick , , , and/or .
-
You can diagnostic shade individual objects from reference data but you can only transform entire Alternatives.
To promote reference data to real geometry
- Choose .
- Select the individual objects in the view windows.
- Choose
-
The reference data you selected is copied as real geometry and appears in the DAG.
To promote a reference shader to the Multi-Lister
Shaders on reference objects do not appear in the Multi-Lister. To be able to use such a shader on regular data or other reference
data, you must first be able to see it in the Multi-Lister by promoting it.
- Choose .
- Select a reference object which is assigned the desired shader.
- Choose
The shader of the reference object you selected is copied into the Multi-Lister. You can then modify the shader and apply
it to other objects without affecting the original shader.
To pack reference data
A saved wire file only contains pointers to any reference data, not the data itself. The Pack functionality allows you to
get all your data in one place for easy transfer.
- Choose from the Reference Manager window
- In the Pack window, browse to the location where you want the information to be stored, and enter a name for the new pack
folder in the field.
- Click
-
The wire file and all reference files are saved in the specified folder. You now have all your data in one location for easy
transfer.
To see different views of the Reference Manager window
In the menu, choose Reference Files to see only the left side of the window, to see only the right side, or . You can also resize the window by dragging a corner.
To modify the appearance of reference data
- To make it visible or invisible – Click the small square (with the double border) to the left of the data with the left mouse
button. You can also right-click the reference file or Alternative and choose from the menu.
- To change its color – Click and hold on the small square (with the double border) to the left of the file name with the right
mouse button, and select a color from the lister.
- To change its transparency – Use the Transparency slider in the Control Panel. This affects all reference data.