


Scale an object with respect to a rotation point and axis of deformation.
 or click its icon.
You can pick and unpick geometry in the Object Lister by clicking the DAG nodes.
Define the pivot point for the deformation by typing an X, Y, Z location or by using the mouse. A cross-hair, the pivot point, appears to mark the center of the rotational scale.
The geometry deforms about the pivot point and toward or away from this second point.
Define the second point by typing an X, Y, Z location, or using the mouse. Another cross-hair appears. The selected curves and surfaces rotate around this axis point.
If you hold down Shift, you can select several objects. You can continue selecting and deselecting geometry during the function.
Select more objects by holding down  and clicking with the
  .
.
to adjust the scale by moving the object.
This new value can be a new scale or a new number of divisions, depending upon the Type of input mode that you chose in the Rotate Options window.
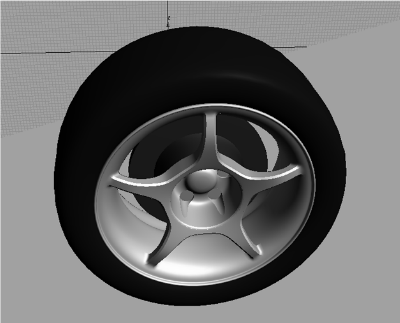
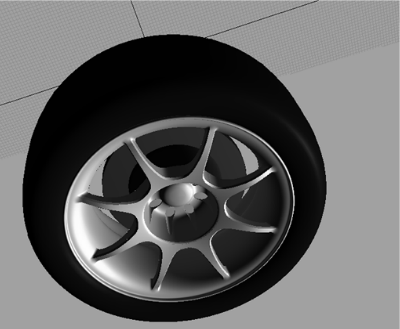
To create an eight-spoked wheel by rotationally scaling a spoke of a five-spoked wheel:
 ❒ or double-click its icon in the tool palette.
To make these copies, use Edit > Duplicate > Object . In this example, the wheel was in the X - Z plane, so the rotation is about the Y axis. Set the following options in the
Duplicate Object Options window:
. In this example, the wheel was in the X - Z plane, so the rotation is about the Y axis. Set the following options in the
Duplicate Object Options window:
A new wheel is created, with eight spokes:
To transform objects with construction history
Some functions, such as Surfaces > Revolve create an object that has construction history. The construction history of an object that is being transformed cannot be
maintained.
create an object that has construction history. The construction history of an object that is being transformed cannot be
maintained.
A confirmation box appears, asking if you wish to continue even though the construction history will be removed:
Select Undo at any time to reset the geometry to its original values (without construction history).
Any continuity present in the model is lost by this deformation and you will have to rebuild the surface. If you keep the deformations relatively small, the resulting continuity may work for presentation only.
Construction history enables curves or surfaces to adjust to changes in the geometry of the objects that generate them. If construction history is lost, to update the generated objects you must re-create them.
For more information about construction history, see Construction history.