Watch a movie.
Rigid targets are free to translate and/or rotate according to the modifications you have made. However, they are not to change shape at all: hence the name "rigid".
Select geometry. [Accept Targets] to add selected geometry as Targets of Transformer Rig.
Press [Free] and [Pre-Defined] to add modifiers!
You are prompted to
Press [Flexible] and [Rigid] to add geometry to transform, [Free] and [Pre-Defined] to add modifier geometry, [Constraints] to add constraint geometry, and [Go].
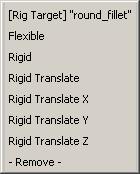
 to open this menu:
This menu enables you to switch a target from rigid to flexible, and vice-versa. You can also prevent rotation of the target by choosing Rigid Translate, or constrain it further by choosing one translation axis.
 to leave the Transformer
Rig toolbox, and select the modifier surfaces.
 to reposition the modifier
surfaces.
Notice the rest of the surfaces are modified accordingly. Specifically, notice that the rigid target surfaces retain their shape.
Bonus movie: Commit and Revert.