Allows you to set an action to a time frame.
You can use this tool to apply keyframe animation to objects, lights, shaders, textures, cameras, and other objects
Active – A keyframe is set for all picked objects. A DAG node, CV, image plane, or camera can be picked using the Pick popup menu items. A cluster percent on a CV is picked when the CV is picked.
A light, shader, texture,
or environment map is active if it is picked in the Render > Multi-lister  > List All. Note that
there is always at least one active element in the Multi-lister.
A window is considered active if it is current. A constraint is considered active if the constrained node is picked.
Set –
A keyframe is set for all objects in the selected sets in the Set
Lister. Choose Animation > Editors > Set Lister  to display the Set Lister.
All – A keyframe is set for every animated parameter of the object.
Global/Local – A keyframe is set only for the parameters that are selected in the GLOBAL or LOCAL parameter control windows.
Choose Animation > Editors > Param Control  to select different global
or local animation parameter
None – Keyframes are set only for the selected objects.
Above – Keyframes are set for the selected objects and all objects in the hierarchies above them.
Below – Keyframes are set for the selected objects and all objects in the hierarchies below them.
If Hierarchy is set to Below, and if there is geometry somewhere below a picked DAG node, keyframes are set for all the DAG nodes below the picked DAG node, but not for any of the CVs. To set keyframes for CVs, select the CVs of the geometry you want to animate and set keyframes for them separately.
Both – Includes both Above and Below.
IK Chain – Keyframes are set for all joints between the root handle and end-effector of the picked IK handle(s). (This includes the joints which are at the root handle and end-effector.)
Another option, And IK Handles, appears when IK Chain is selected. Turn ON the And IK Handles option to set keyframes for the picked IK handles.
Skeleton – Keyframes are set for all joints belonging to skeletons which have one or more picked nodes.
Current –
Keyframes are set at the current time. The current time is always
displayed in the active modeling window, the Animation > Show > Toggle Time Slider  , and Animation > Editors > Action Window
  .
.
Prompt – Makes the system prompt you to enter the times at which to set a keyframe when you invoke Set keyframe.
Click the items to the right of the In Tangent Type and Out Tangent Type headings to display menus from which you can select In and Out tangent types that control how the tangents of the new keyframe are computed when the keyframe is created.
Tangents describe how an action is interpreted between the keyframes that you have set. Each keyframe has two tangents, an in-tangent and an out-tangent. These tangents describe the behavior of the action on the left (in-tangent) and right (out-tangent) sides of a keyframe.
The following tangent types are available:
SMOOTH – Creates a smooth transition between the keyframe before and the keyframe after the new keyframe.

The tangents are co-linear (both at the same angle). This ensures that there is no jerkiness at the keyframe. The angle of the tangents is a weighted average of the slopes between the two keyframes on either side of the new keyframe.
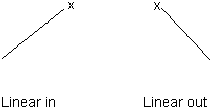
LINEAR – Creates a straight line between two keyframes.

If the in-tangent type is LINEAR, the curve segment before the new keyframe is a straight line.
If the out-tangent type is LINEAR, the curve segment after the new keyframe is a straight line.
IN/OUT – Eases out of one keyframe and into the next keyframe.

If the in-tangent type is IN/OUT, the curve segment before the new keyframe will ease in and out.
If the out-tangent type is IN/OUT, the curve segment after the new keyframe will ease in and out.
FLAT – Causes the in and out-tangents of the new keyframe to be horizontal (with a slope of 0 degrees).

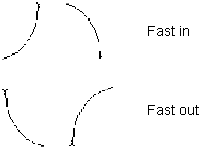
FAST – If the in-tangent type is FAST, it makes the movement slow out of the previous keyframe and faster going into the new keyframe. For example, a car that is accelerating.

If the out-tangent type is FAST, it makes the movement faster going out of the new keyframe. An example is a car that is slowing to a stop.
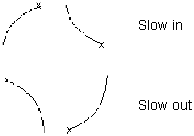
SLOW – If the in-tangent type is SLOW, it slows the movement down as it enters the new keyframe.

If the out-tangent type is SLOW, it makes the movement slower at the beginning of the curve segment that follows the new keyframe.
STEP – Specifies that the out-tangent of the new keyframe is flat. The curve segment is also flat (horizontal) until the next keyframe, at which point it jumps up or down to the value of that keyframe.

This is useful for animating Boolean (ON/OFF) values such as the DAG node visibility or the presence or absence of a light’s shadows. A value greater than 0.5 turns it ON, and less than 0.5 turns it OFF.