Select > Select Using
Constraints
These are the options
for the Select Using Constraints feature.
NoteThe options that
display in the Select Using Constraints option
window are dependent on the selection of components in the scene
view. That is, you must first select an example of the component
type you wish to filter in order to display the related options
within the Select Using Constraints option
window before you can set the filter options.
At the very top of the
window in the Constrain list, you specify
conditions to filter your selection actions in different ways. These
options apply to all component modes. Click the option to make your
selection. Which constraints are applied, and to what settings,
is determined by the options you set. There are four different modes:
- Nothing
-
When on, no selection
constraints are used. This is the default setting.
- Next Selection
-
When on, the constraints
affect only the next selection mode with a technique such as holding
the Shift key and clicking the left mouse button.
- Current and Next
-
When on, Maya applies
the constraint to whatever has already been selected, plus whatever
selection you make next.
- All and Next
-
When on, Maya applies
the constraints to the entire object automatically, plus whatever
group you select next.
Constraint Properties options
The following section describes the options
you can set for selected components in the properties section of
the window.
Location properties
The following options
are applicable to all component types.
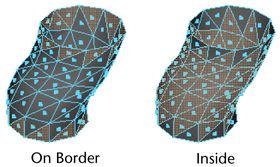
Location
Select where the items
are constrained.
- Off
-
If selected, this constraint
is not taken into account. The Off option
means the same for every option in the Properties section.
- On Border
-
If on, the selection
constrains to only the items on the perimeter of the current objects.
- Inside
-
This is the default setting
for Location properties. Maya selects only the items on the inside
of the current objects. It has the reverse effect of On
Border.
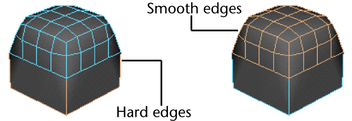
Smoothing properties
(for edges only)
If
you select edges, Smoothing options are made
available. These Properties options do not display
for any other component type.
Smoothing
Select the type of edges.
- Hard/Smooth
-
Click one of these options
to constrain the selection to either hard or soft edges.
Constraint Properties for
faces
In addition to the
properties that all component modes share, when you are in the face
component mode, Maya provides numerous face-specific properties.
For example, you can set options to select faces according to order,
planarity, and shape— if a polygon is concave instead of
convex—as well as mapping and topology.
These are described next.
Order
Order options are used
to set a valid range for the shape of the faces. If the following
options are on, Maya constrains the selection to what you specify.
- Triangles
-
Maya only selects faces with three edges.
- Quads
-
Maya
only selects faces with four edges.
- N sided
-
Maya only selects faces other than triangles or quads
(faces that have more than four edges).
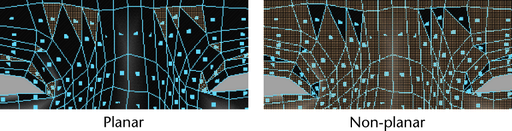
Planarity
Select eitehr Planar
or Non-planar faces.
- Planar/Non-planar
-
Planar selects
only planar faces. Non-planar selects only non-planar
faces.
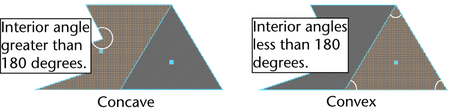
Convexity
Select polygons based on the
angle of their sides.
- Concave/Convex
-
Concave selects
polygons that have at least one interior angle greater than 180
degrees. Convex selects polygons whose
interior angles are all less than or equal to 180 degrees.
Domains
Select faces based on whethe they have
a hole or not.
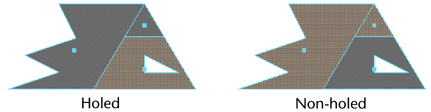
- Holed/Non-holed
-
If you select non-holed,
only faces that do not have holes are selected. If you select Holed,
only faces in which holes have been created (using the
Mesh > Make Hole Tool)
are selected.
NoteMaya considers faces
with holes to be concave.
- Mapping
-
Depending on what you choose, only mapped or
unmapped faces are selected. Mapped faces are faces with texture
(UV) coordinates—unmapped faces do not have texture (UV) coordinates.
Topology
Select from various types
of problematic faces.
- Lamina
-
A group
of faces glued on top of each other are selected. For example, two
faces whose normals face each other.
- Non-triangulable
-
Geometry options
Min and Max values
The Min and Max values
for most of the Geometry options correspond
to the units of a polygonal face. The values you set constrain the
selection to the size of the face that corresponds to those units.
The default unit size is in centimeters by default. You can change
this in the Preferences window (
Window > Settings/Preferences > Preferences,
then click the Settings category).
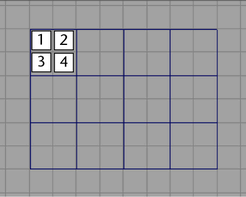
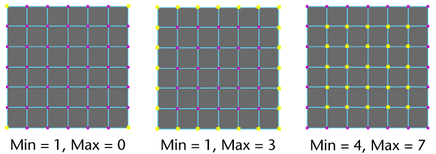
In this example, each
face of a polygonal primitive plane is four units. You can determine
this by looking at the squares of the grid within each face.
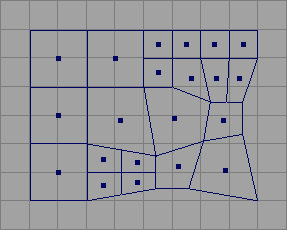
When you scale some of
the faces and subdivide others, the topology changes as do the Min and Max values
you can enter to constrain the selection area.
Try setting different Min and Max values
for the Area option for faces, for example,
to determine which faces fall within the Min/Max criteria
determined by the unit size.
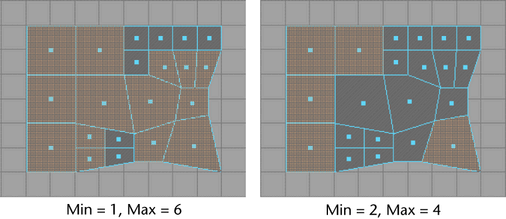
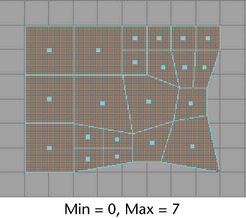
If you set the Area criteria
to a Min value of 0 and a Max value
of 7, all faces are selected because there are no faces with a unit
area less than 0 or greater than 7.
TipIf you want to constrain
the selection for a unit area that is very small, such as the area
under the eyes on a polygonal modeled face, set the Min and Max values
to a small value. The opposite is true if you want to set the constraint
area to the cheeks of the face where the faces cover more unit space.
Options common to all Geometry sections
(Activate and Off)
Each section contains
an Activate switch or an Off option.
- Click Activate (to
turn it on) to tell Maya to acknowledge these option settings when
making your selections.
- Click Off (to turn
it on) to tell Maya not to acknowledge these option settings when
making your selections.
Area options
for faces
Maya selects the faces
with an area that is within the range specified in the Min and Max boxes.
See
Min and Max values for
details about using these values.
Neighbors options
for vertices and UVs
Maya selects the vertices
with no fewer than the Min number
of edges connected to them and no more than the Max number
of edges connected to them.
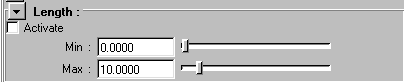
Length options
for edges
Maya selects the edges
whose lengths are within the range specified in the Min and Max boxes.
TipUse this selection
constraint option after collapsing edges (Edit Mesh > Merge
To Center) to remove the extra tiny edges sometimes produced
as a result of converting a NURBS object.
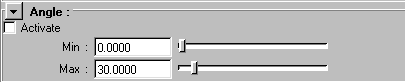
Angle options
for edges, vertices, and UVs
Maya selects edges based
on the angle between the two faces sharing the edge. The possible
range of angles is set using the Min and Max values.
Maya selects vertices
based on the angle between the edges sharing the vertex. The possible
range of angles is set using the Min and Max values.
In the case of UVs, Maya
selects them according to the range set for the angle between the
edges joining the UVs corresponding to vertices.
NoteThis option works
only for non-border edges.
Mapped Area options
These options are used to control the area range
of components that are flattened out in the UV
Texture Editor window.
- Unsigned
-
If on, Maya selects all
faces whose flattened areas (whether they are positive or negative)
are within the minimum and maximum values you set. Unsigned tells
Maya to ignore the direction the face normal is facing.
- Signed
-
If on, Maya selects all
faces whose normals are pointing in the same direction and whose flattened
areas are within the minimum and maximum values you set.
- Min/Max values
-
You can enter the minimum
(Min) and maximum value (Max)
for this area which lies in the UV plane. The mapped area of a flattened component
can be positive or negative. It is positive if the face is seen
from the front and negative if seen from the back.
Distance options
These
options are used to set a reference point and a valid range for
the distance between the component, (such as the face center) and
the point you specify.
- Point
-
The Point option
determines whether Maya acknowledges the distance to the origin
you specify (the P, or PointX, PointY,
or PointZ values).
- Axis
-
The Axis option
determines whether Maya acknowledges the distance to the line defined
by its origin (P) and its axis (V).
- Plane
-
The Plane option
determines whether Maya acknowledges the distance to the plane defined by
its origin (P) and its normal (V).
- Px, Py, Pz
-
These
values are used to define the location of the point from which you
want the selection to extend.
- Vx, Vy,
and Vz
-
If Axis is
selected, these values define the axis along which the selection
is made. If Plane is selected, these values define the normal vector along
which the selection is made.
Orientation options
for faces, edges, and vertices
- Orientation
-
The Orientation option
determines whether Maya uses the orientation of the component for the
selection.
- Direction
-
The Direction option
determines whether Maya uses the direction of the component or the selection.
Using this option, even two faces facing opposite each other can
be selected.
- Vx, Vy,
and Vz
-
These values define the
axis along which the selection is made.
Visibility options
for faces, edges, and vertices
These options are used
to set a target point and a focal angle for your selections. Maya
selects a component if the target point can be viewed from the center
of a face with its normal as the viewing axis (the Px, Py,
and Pz values) and the angle as
the field of vision.
- Angle
-
This value determines
a focal angle for selected components.
- Px/Py/Pz
-
The Px value
determines the location of the target point in the X axis, the Py value
for the Y axis, and the Pz value
for the Z axis.
Random option
- Ratio
-
This value determines
how many components to randomly select according to the ratio value you
set within the face units. For example, 0=no faces, 1=all faces,
or 0.5=50% of the faces.
Propagation options
You
can extend your selection using the propagation options at the bottom of
the window.
- Off
-
This option is on by
default. That means that no extensions are performed.
- Shell
-
Select Shell to extend
the selection up to the border of the individual piece within which
the selection has been made. This option is useful for objects made
from a series of individual pieces such as those produced when you
use Polygons > Combine.
- Border
-
Choose Border to
select the border of the current selection only.
TipWith Constrain set
to All Next, select Inside as the Properties
Location and Propagation Shell at the
bottom of the Constraints window, then click a
single face to selects all the faces that are inside your object.
Grow Selection Region, Shrink
Selection Region, Select Selection Boundary
buttons
These
buttons work the same way as the corresponding Select menu
items.
- Click Grow Selection Region to
increase the number of components you initially selected.
- Click Shrink Selection Region to
decrease the number of components you have selected. This button
can be useful if you want to shave off one face around every face
in the current selection.
- Click Select Selection Boundary to
define the boundary of the current selection region. This is a quick
way to select the boundaries of whatever is currently selected (faces,
vertices, edges, or UVs).