Maya provides several features for separating, merging, and attaching UVs. These features can be particularly useful when working with UVs that were generated using the Automatic Mapping feature.
| To... | Do this |
|---|---|
Separate a UV shell along the selected edges. |
Select Edit UVs > Cut UV Edges.
|
Attach UV shells along the selected edges. |
Select Edit UVs > Sew UV Edges.
|
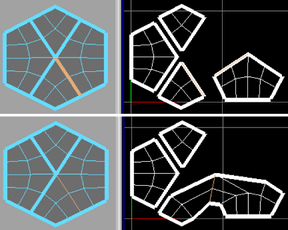
Attach UV shells along the selected edges and move the shells together. |
Select
Edit UVs > Move and Sew UV Edges >
|
Merge the selected UVs. |
Select Edit UVs > Merge UVs. Merge UVs only merges the UVs that share the same vertex. You can specify an option for the maximum distance Maya will move UVs to merge them. |
Automatically attach and move small shells. |
Select all the shells
and choose
Edit UVs > Move and Sew UV Edges > Turn on Limit Shell Size and set the maximum size (in number of faces) for UV shells. Shells larger than this number will not move. Click Apply. |
After performing a Move and Sew UV Edges operation, you can select the node (polyMapSewMove) and edit it in the Attribute Editor or Channel Box to adjust the Number Faces.


 . Turn
off
. Turn
off 