


Lesson 2: Painting Sticky Weights to Bones

In the next steps you will paint some weights on the mesh. The Muscle Paint tool lets you paint capsule, bone, muscle, and other types of weights, as well as set weights on points, much like a component editor.
This scene contains the dragon leg with connected bones and capsule objects. The dragon leg mesh is set up with default Sticky weights applied to the capsules for basic skin deformation.
You can use the Display Layer Editor to show and hide various parts of this rig.
After you apply default weights to the bones and polygon mesh objects, you can use the Muscle Paint tool to refine those weights. You can choose to raise or lower the effect of the default weights by further painting weights on the skin mesh.
The Muscle Paint tool appears and the mesh displays in Paint mode, in a black color.
The Muscle Paint tool provides many of the same basic features as the artisan paint tools. See Muscle Paint tool to learn more about its specific attributes.


In the next steps, you set weights on specific points, rather than paint them on the entire upper leg.
Set weights to specific points

The painting features are now disabled in the Muscle Paint tool, and the points of the skin mesh appear.
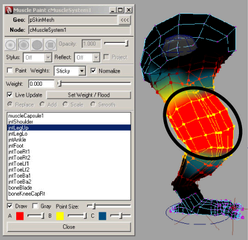
Notice that the Live Update option is on. This means as you drag the Weight slider the weights update interactively. When Live Update is off, you can set the weight value, but the weight does not change until you click Set Weight/Flood.
When you have multiple points selected and Live Update is on, the Weight slider automatically adjusts to show the average weight to the current object for the selected points. For example if you select some points where the mesh is black and where the mesh is red, the Weight slider shows the average value of those points.
In the next steps, you will smooth the transition between the shoulder (hip) and upper leg joint. To make sure weights don’t get re-normalized to other bones, you can lock weights for them all.
A HOLD marker appears next to each joint, meaning the current weights for those items are locked and cannot be adjusted, even if you paint around that item. You can now safely smooth weights between the shoulder and upper leg only, since those are the only two joints currently unlocked.

When you are finished, you should have a basic skin setup with bones. You can load the tut_dragonLeg_paintBones_END.ma file to see an example of basic Sticky weights painted for bones.

In this lesson you learned how to:
Painting Sticky weights to bones or capsules gives an effect similar to Maya skinClusters. The main benefits of the Muscle skin deformer for this type of work is both the color feedback, as well as the ability to use other features of the deformer such as Sliding, Jiggle and so on as discussed in the following lessons.
In general, it is recommended that you first paint weights to only the capsules and bones on your mesh before working with muscles and Sticky weights. This can help keep your weighting structured and organized.