


Learning Resources > Tutorials > Getting Started with Maya Unlimited > Live > Lesson 1: Track and solve >
Evaluating a solved solution
Now you must determine if the solution correctly matches the camera movement. If correct, the solution locators will be arranged like the points from the actual film set. For example, the points along the fence should be aligned along a plane. Also, Maya’s camera will move around the locators in a way similar to the real camera movement.
To evaluate the solved solution
The Overall Pixel Slip is a general indicator of the solution’s accuracy. Overall means it is an average for all points on all frames. Pixel slip measures how well each 3D locator matches with the track point in the background—as viewed through the solved camera. For example, if flower1 and flower1_3D appear separated by one pixel on all frames, the pixel slip is 1.0. The lower the pixel slip, the more accurate the solution.
Ideally, Overall Pixel Slip should be less than 2. But this doesn’t mean the solution will mimic the live footage camera movement satisfactorily. In the next steps, you’ll find out whether it does.
If Overall Pixel Slip reads “poor” or a number higher than 2, you need to fix a problem in your track points. Return to the Track control panel and repeat the instructions Preparing to solve.
If you still cannot reach a solution below 2, we recommend you continue the lesson using a scene we have prepared for you. Choose File > Open Scene, navigate to the MayaLiveLessonData/scenes directory, and double-click goodPoints.ma. Live loads a scene with the same track points, carefully created to avoid problems. When you click Solve in the goodPoints scene, your Overall Pixel Slip will read about 1.0.
You need to judge whether the camera moves the way you expect. You know the camera starts above the set and moves down, so it should start above the locators and sweep down in the same way. Compare the frames in the following illustration.
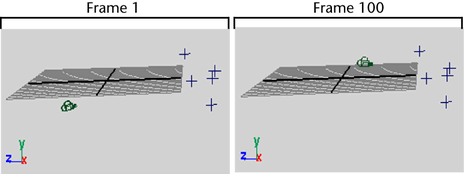
In this case, the camera starts below the locators and moves up instead of down. It also makes a series of abrupt movements. This solution is incorrect.
The Locator Summary graphs the pixel slip of each point over time. You already looked at the overall pixel slip, but the Locator Summary lets you find which point has the most pixel slip and on which frames.

If one point had a very red and yellow graph, you could conclude that the point was the source of the problem solution. In this case, many points have red and yellow areas, but those areas appear mainly in the first 100 frames.
Because red and yellow areas all occur within the first 100 frames, you can conclude that the solver does not have enough information for those frames. To improve the information, you’ll need to add one or more track points for those frames.
How many points you’ll need is not important to fixing this problem. Rather, choosing the right points is what will help the solver. In the following steps, you’ll load another set of points into your scene. These points will illustrate which types of points to choose.