- Insert the Maya DVD into your drive.
The Maya installer window appears.
On 64-bit systems, you are given the choice to install the 32-bit or 64-bit version of Maya.
If the Maya installer does not appear, choose Start > Run. Click Browse and choose the Autorun.exe file in the platform-appropriate area of the Maya DVD. Click OK in the Run dialog box to begin the installation.
- Click Install Maya to begin the software installation.
The Autodesk Product Configuration wizard appears, displaying the software License Agreement screen. This License Agreement requires your acceptance for the Maya software installation to continue.
- Click I Accept, then click Next to continue.
The component selection screen displays.
- Select whether you want to install Autodesk Maya 2009, the Autodesk Maya 2009 Documentation, or both (the default), and click
Next.
The installation proceeds, and the Maya Installation Wizard appears.
This wizard directs you through the process of installation. Click Next to proceed through the installation, Back to return to the previous window, or Cancel to stop the installation.
- Click Next to continue with the Maya software installation.
The Maya Product Configuration window appears.
- On the Maya Product Configuration screen, you can set two options:
The Full setup installation is the recommended installation for most users. It installs the Maya application, installs all related
applications and utilities, and sets the file type associations on your computer for Maya file types.
If you want to install specific components of the Maya application (for example, the Japanese User Interface Resources), or modify the default file associations, choose Custom setup from the menu.
If you want to change the default location for the software installation, click Change. The Windows browser appears. Browse to the install location or enter the path.
Do one of the following:
- Select Full to select a Full setup Maya installation (recommended), click Next, and proceed.
- Select Custom, click Next, and proceed to the next step.
- (Custom installation only) The Feature Selection window appears.
By default, Japanese User Interface Resources are turned off. If you want to turn on or off an item so it installs or does not install, click the down arrow icon in the
list and change the selection from the submenu.
At a minimum, you must install the following to run Maya:
- Maya Program Files—contains the core Maya software
- Licensing—includes files essential to licensing.
From this window, you can also click Help to get custom setup tips or click Space to check available space on connected hard drives.
When you are ready to proceed, click Next.
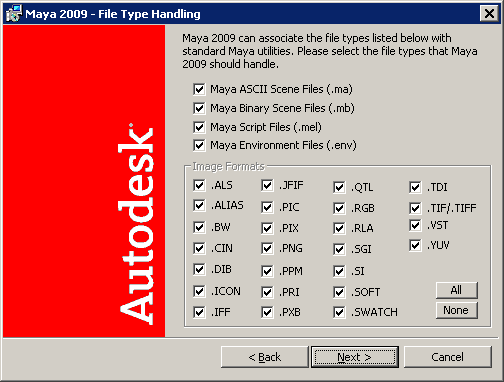
- (Custom installation only) The File Type Handling window appears.
You can set how various file format types are handled on your computer using the options in this window. For example, if you
double-click a Maya binary scene file (.mb), the computer automatically launches Maya based on the file type associations that have been set. Depending on the other
software you have configured on your computer, you can either leave these options as is, or change them to suit your particular
setup.
When you are ready to proceed, click Next.
- (Full or Custom installation) The Add Location To Path window appears. The options in this window are turned on by default.
- Add a Shortcut to the Quick Launch Toolbar—Adds a Maya shortcut icon to your Windows Quick Launch Toolbar.
- Add to System Path—Adds the Maya executable directory to your Windows system path. This lets you start Maya or any of its related programs from
any directory when using the command prompt; for example, at the command prompt, you could simply type maya to launch Maya or fcheck to launch the FCheck image-viewing utility. Setting the system path may also be useful for batch files and other scripts
involving Maya or other related programs.
- Add a Shortcut to the Desktop—Adds the Maya shortcut icon to your desktop during the installation.
Make your selections and click Next.
- The Ready to Install the program window appears. If you want to review or change any of your installation settings, click Back; otherwise, click Install.
The Maya software and accompanying utilities are installed on your computer. The progress of the installation is indicated
by the progress bar in the installer window.
- Continue with the license setup program after the software installation:
- If you’re an existing Maya customer, start the Product Configuration Wizard after installation by selecting Maya from the
Windows Start menu. In the Autodesk Product Configuration window select the "I have a serial number that I need to activate” option. Click
Next and enter your product serial number. Follow the remaining steps to get your license and activate your product.
- If you’re a new Maya customer, start the Product Configuration Wizard after installation by choosing Maya from the Windows
Start menu. See
Quick Start Licensing.
- If you’re setting up a license server, see
Server setup and
Licensing Maya for details on how to set up both servers and clients.
For more information, see
Licensing Maya.
NoteIf you are licensing your computer using a USB hardware lock, you may need to reboot your computer for the licensing process
to detect your hardware lock. For more information, see
Licensing Maya.