Show in Contents

Add to Favorites

Home: Autodesk Maya Online Help
 
 Template display

Lesson 4: Components and attributes

The Attribute Editor


            Components


      All
         objects in Maya have a transform and a shape node. Geometric shapes, like
         the primitives in this tutorial, have smaller parts called components.
         A few examples of components in Maya are control vertices, faces,
         and hulls. Components allow you to work with objects at a finer
         level and allow you to edit them in creative ways.
      
      In order to change the shape of the entablature
         beyond the basic scale transformations, you need to modify its component
         information.
      
      To
         select components of the entablature
      
      
         - In
            the side view, dolly in for a closer view of Entablature.
         
- Set
            the Selection Mode to Component mode.
         
- Right-click
            the wireframe of Entablature and select Control Vertex from the
            pop-up menu.
            The menu that pops up is a marking menu for
               quickly selecting operations relevant to the object where you right-click
               the mouse. In this case, the choices pertain to the display of the
               entablature’s components.
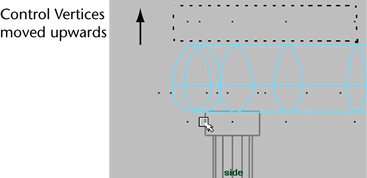
             A
               set of small blue squares appear on Entablature called control vertices. Control
               Vertices (CVs) describe the shape of an object based on their position
               in space. If you move any combination of these vertices, you change the
               shape of the object.
             
- Drag
            a selection box around the top row of vertices so they become selected.
         
- Using
            the Move Tool, move the vertices
            up vertically as shown below to change the shape of Entablature.
         
- To
            cancel the display of the CVs, right-click the wireframe of Entablature once
            again and select Object Mode from the pop-up
            menu.
         
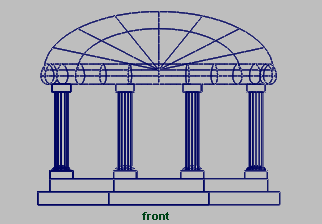
The roof for the temple rests on top of the
         entablature. The roof for the temple is created using one half of
         a sphere primitive.
      
      To
         create a roof for the temple
      
      
         - Select 
                     Create > NURBS Primitives > Sphere >  . .
- In
            the NURBS Sphere Options window,
            select Edit > Reset Settings and then
            set the following options:
            
               - Start
                     Sweep Angle: 0
               
- End
                     Sweep Angle: 180
               
- Radius:
                  8.75
               
- Number
                     of Sections: 8
               
- Number
                     of Spans: 4
               
 In the NURBS Sphere Options window,
               click Create.
             
- Rename
            the half-sphere templeRoof.
         
The roof needs to be rotated -90 degrees about
         the X axis and positioned on top of the entablature.
      
      To
         rotate and position the roof on the entablature
      
      
         - In
            side view, rotate the roof so that the dome part is pointing up.
         
- Move
            the roof so it is positioned close to the top edge of Entablature.
         
- Scale
            the roof along its Z axis (blue manipulator handle) so that the
            sphere becomes slightly squashed in appearance.
         
Now that the roof is complete, you can untemplate
         the templated objects.
      
      To
         untemplate objects
      
      
         - On
            the Status Line, choose the Select
               by Hierarchy and Combinations button.
         
- On
            the Status Line, choose the Select
               by hierarchy: template button.
            Select by hierarchy: template ensures
               that only templated objects will be affected by a selection.
             
- In
            the scene view, drag a selection box around all the objects in the
            scene so that the templated objects are selected simultaneously.
         
- From
            the main menu, select 
                     Display > Object Display >
            Untemplate.
         
- On
            the Status Line, choose the Select
               by hierarchy: root button.