Contains the main controls for processing a radiosity solution.
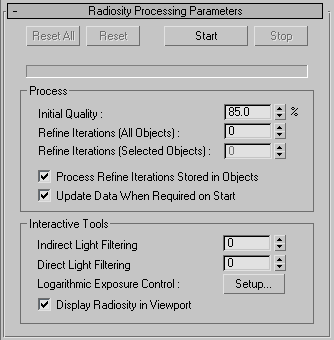
Starts the radiosity processing. Once the radiosity solution has reached the percentage amount specified by Initial Quality, this button changes to Continue.
If you click Stop before reaching the full Initial Quality percentage, then clicking Continue causes radiosity processing to resume, until the full percentage is reached, or you click Stop once more. You can click Stop and then Continue more than once.
In addition, you can calculate radiosity up to an Initial Quality less than 100 percent, then later increase the value of Initial Quality, click Continue, and resume solving radiosity.
In either case, Continue saves time by avoiding regenerating the radiosity solution from scratch.
Once the full Initial Quality percentage has been reached, clicking Continue has no effect.
The options in this group set the behavior of the first two stages of the radiosity solution, Initial Quality and Refine.
Sets the quality percentage at which to stop the Initial Quality stage, up to 100%. For example, if you specify 80%, you will get a radiosity solution that is 80% accurate in energy distribution. A goal of 80 to 85% is usually sufficient for good results.
During the Initial Quality stage, the radiosity engine bounces rays around the scene and distributes energy on surfaces. Between each iteration, the engine measures the amount of variance (noise between surfaces) that was computed.
Most of the brightness of the scene is distributed in the early iterations. The contribution to the scene’s average brightness decreases logarithmically between iterations. After the first few iterations, the brightness of the scene does not increase much, but subsequent iterations reduce the variance in the scene.
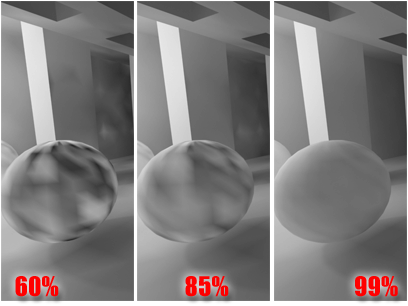
Increasing the percentage value of Initial Quality.
Increasing quality does not greatly increase the average brightness of the scene, but it decreases the variance between different surfaces in the scene, such as the faces of the sphere.
Sets the number of Refine iterations to perform for the scene as a whole. The Refine Iterations stage increases the quality of the radiosity processing on all objects in the scene. Gathers energy from each face in order to reduce the variance between faces using a different process from the Initial Quality stage. This stage does not increase the brightness of the scene, but it improves the visual quality of the solution and significantly reduces variance between surfaces. If you don’t reach an acceptable result after processing a certain number of Refine iterations, you can increase the number and continue processing.
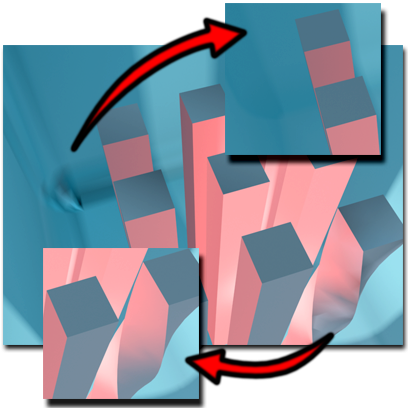
Large image with no iterations has areas of uneven illumination.
Inset images: After a number of iterations, the uneven areas have been corrected.
Sets the number of Refine iterations to perform for selected objects, using the same method as Refine Iterations (All Objects). Make an object selection and then set the number of iterations you require. Refining selected objects rather than the entire scene can save a lot of processing time. Typically, this option is useful for objects that have a lot of small surfaces and show a lot of variance, such as railings or chairs or highly subdivided walls.
Each object has a radiosity property called Refine Iterations. Each time you refine an object selection, the number of steps stored with these objects is incremented.
When you reset the radiosity solution and then start it again, the steps for each objects are refined automatically, provided this toggle is turned on. This is useful when you are creating animations, when the radiosity needs to be processed at every frame, and the same level of quality between frames has to be maintained.
When on, the radiosity engine must be reset and then recalculated if the solution is invalidated. In this case, the Start menu changes to read Update & Start. When this is pressed, the radiosity solution is reset and the calculation starts over again.
When this toggle is off, the radiosity solution does not need to be reset if it is invalidated. You can continue processing your scene with the invalid solution.
The options in this group help you adjust the display of the radiosity solution in the viewport and in the rendered output. These controls take effect immediately on an existing radiosity solution and do not require any additional processing for you to see their effects.
Reduces the amount of noise between surface elements by averaging the indirect lighting levels with the surrounding elements. A value of 3 or 4 is usually sufficient. If you use too high a value, you risk losing detail in the scene. Because Indirect Light Filtering is interactive, you can readily evaluate the result and adjust it as you need.
Reduces the amount of noise between surface elements by averaging the direct lighting levels with the surrounding elements. A value of 3 or 4 is usually sufficient. If you use too high a value, you risk losing detail in the scene. Direct Light Filtering is interactive, so you can readily evaluate the result and adjust it as you need.

For a 65% quality solution, increasing the Indirect Light Filtering value from 0 to 3 creates a smoother diffuse light. The results are comparable to a much higher-quality solution.
Displays the name of the current exposure control.
(When you change the exposure control by choosing Rendering menu  Environment, the name display in the Radiosity dialog updates automatically.)


 (Render Setup)