A CATMotion preset comprises the settings for all CATMotion controllers for a particular motion cycle. This data is contained
in a CATMotion layer, which is different from the animation layers found on the Layer Manager rollout. You can save and load
individual layers using text files with the extension .cmp.
Using CATMotion Layers
Like the CAT Layer Manager, CATMotion has a layers system, only for cyclical motion rather than for overall, frame-by-frame animation.
The similarities are:
- The layers are evaluated from the top of the list to the bottom, with layers lower on the list taking precedence over previous
ones. For example, if the stack contains three layers, named Layer01, Layer02, and Layer03 (in that order in the list), and
they all have Weight values of 100%, then the output consists exclusively of the animation in Layer03; the other two are ignored.
- If a layer lower on the list has a Weight value of less than 100%, its motion is combined with one or more preceding layers.
In the previous example, if the Layer03 weight is 33.3% and the other two remain at 100%, then one third of the motion comes
from Layer03 and two thirds from Layer02; Layer01 is still ignored.
- You can animate the Weight values to change how the layers blend throughout the animation. For example, say you have two layers:
HappyWalk and SadWalk, in that order in the Current Layers list. When the Weight value for SadWalk is 100%, only that motion
cycle is used. But if you were to turn on Auto Key and then set the Weight value for SadWalk to 0% at frame 34 (of a 100-frame
animation) and then back to 100% at frame 67, then the first and last thirds of the animation would use SadWalk, while the
middle third would use HappyWalk.
There are differences, though, especially in the use of the curve graphs in the CATMotion editor. There is only ever one curve
for any particular controller, no matter how many layers there are; the curve is the weighted, combined output of all the
layers. When you edit the curve, you’re actually editing that combined output. So, for example, if you drag a point on a curve
for a track weighted at 50%, with the previous track at 100%, the point will move at only half the rate of the mouse.
Thus, for predictable results when editing curves, set the Weight for the track you’re editing to 100%; you can lower the
value later, if you like, to mix the track with those lower on the stack.
ImportantYou can edit values in a CATMotion layer only when the Weight value for the layer is over 50.0% (that is, 50.001% or higher). But, again, for predictable results, always
set a layer weight to 100% when editing its components.
Procedures
To load a CATMotion preset:
- If you want to replace an existing layer with the loaded preset, highlight the layer to replace in the Current Layers list.
- In the Available Presets list in the CATMotion Editor, navigate to the preset to load and double-click its name.
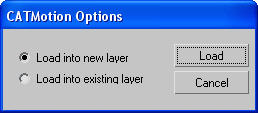
The Options dialog opens.
-
Choose whether to create a new layer or to replace the existing (highlighted) layer with the new one.
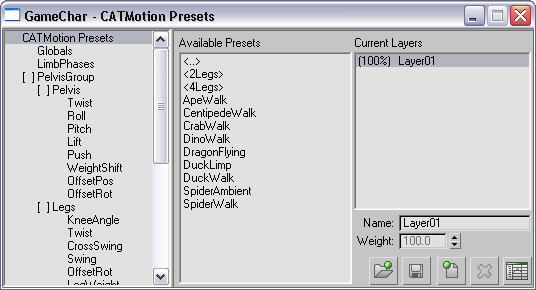
After you load a preset, its name appears in the Current Layers list on the right-hand side of the dialog. The name is highlighted,
and the preset has a weight of 100%.
The preset is now loaded and in effect.
To remove a CATMotion layer:
- In the Current Layers list, highlight the layer to remove.
- Click
 (Remove Layer).
NoteYou cannot remove the first layer.
To save a CATMotion preset:
- Highlight the layer to save.
- Click
 (Save Preset).
- Navigate to the desired folder.
- Enter a new preset name.
- Click Save.
To blend between CATMotion presets:
- Animate the Weight value for the highlighted layer.
TipTo create or edit Weight animation, on the CATMotion Presets panel, click

(Weights View).
The rest of the editor window is dedicated to editing the selected layer, whether it is a loaded preset or a new, default
layer.
Note Before editing a preset, make sure the Preset layer to edit is highlighted in the Current Layers list.
You can load a CATMotion preset successfully onto a rig with any configuration, but not necessarily with ideal results. For
example, loading a preset for a four-legged creature onto a biped will likely give undesirable results. It’s important to
use sound preset naming conventions.
As with the Layer Manager, the layer at the top of the stack overrides those underneath it. Each layer has an animatable weight
to allow blending between presets.
- Available Presets
-
This list shows the CATRig presets in the current folder. You can navigate up to other folders by double-clicking the <..>
symbol at the top of the list.
- Current Layers
-
This list shows the currently loaded layers/presets of your CATMotion layer. If the Current Layers list contains multiple
layers, you can view and edit a layer/preset by clicking on it, so the curves for that layer/preset will be active in the
CATMotion hierarchy, ready for editing.
Note The advantage of having multiple layers in the Current Layers list within a single CATMotion layer is that you can blend
seamlessly between different walk cycles while still controlling the whole walk sequence with a single set of footprints.
This means you have non-sliding footsteps even while blending between different walk cycles (for example, walk/run/sneak).
If you used multiple CATMotion layers in the Layer Manager instead, blending between the CATMotion layers would result in
sliding footsteps and a lot of unnecessary footprints.
- Name
-
The name of the highlighted layer.
- Weight
-
The weight of the highlighted layer.
-
 Open CATMotion Preset
-
Click to browse for a preset.
-
 Save CATMotion Preset
-
Save the settings of the highlighted CATMotion layer as a new preset.
-
 Add CATMotion Layer
-
Create a new default CATMotion layer to edit.
-
 Delete CATMotion Layer
-
Delete the highlighted layer.
-
 Curve Editor: CATMotion Weights
-
Edit CATMotion Layer Weights in Track View .
Use this function to edit the animation of preset weights, blending between presets.

 (Remove Layer).
 (Save Preset).

 Open CATMotion Preset
 Save CATMotion Preset
 Add CATMotion Layer
 Delete CATMotion Layer
 Curve Editor: CATMotion Weights