 Command entry:
Customize menu

Configure User Paths

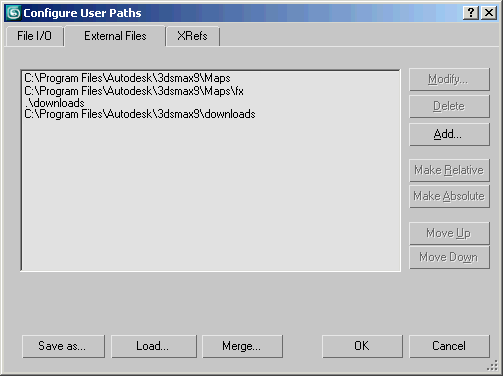
Configure User Paths dialog

External Files panel
On the External Files panel of the Configure Paths dialog, you can add or modify path directories for bitmaps, DirectX effects (FX, CGFX, and XMSL files), and downloads: That is, files transferred from the Internet with i-drop. Bitmaps are used for background images and mapped materials (textures, bump maps, displacement maps, and so on). FX files are used by the DirectX Shader material.
NoteBy default the paths for \Maps\fx, \Maps, and the root folder are all relative to the root directory of 3ds Max whereas the \downloads folder is relative to the project folder by default.
3ds Max stores the path of any file you load. When the file is reloaded, the search order is as follows:
- The path saved with the file.
- The directory of the current scene.
- The paths listed in the External Files panel, starting at the top of the list.
NoteTo save loading time, if a map with the same name exists in two different locations (paths), 3ds Max loads it only once. This can cause a problem only if your scene includes two different maps with the same name. In this case,
only the first map encountered will appear in the scene.
- Every subdirectory under the directory of the current scene.
For descriptions of the general dialog controls, see Configure User Paths.
Procedures
To modify a file path:
- On the External Files panel, choose a path entry.
- Click Modify.
- In the Choose Directory dialog, do one of the following:
- Enter a path in the Path field.
- Navigate to locate a path.
- Click Use Path.
The new path takes effect immediately.
To add a path for a file:
- On the External Files panel, click Add.
- On the Choose New Bitmap Path dialog, do one of the following:
- Enter a path in the Path field.
- Navigate to locate a path.
- If you want to include subdirectories in this path, turn on Add Subpaths.
- Click Use Path.
The new path takes effect immediately.
To delete a path for a file:
- On the External Files panel, choose a path entry.
- Click Delete.
The path location is removed.
- Click Cancel to restore the path.
This closes the Configure Path dialog without saving any path changes.
To move a path up or down in the list:
- On the External Files panel, choose a path entry.
- Do one of the following:
- Click Move Up to move the entry closer to the top of the list, giving it a higher priority in the search process.
- Click Move Down to move the entry closer to the bottom of the list, giving it a lower priority in the search process.
