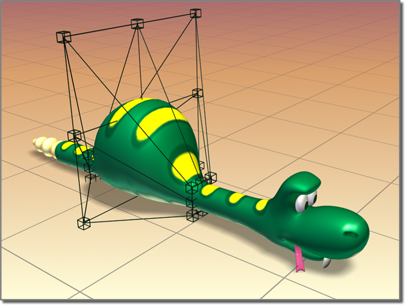
FFD stands for Free-Form Deformation. Its effect is used in computer animation for things like dancing cars and gas tanks. You can use it as well for modeling rounded shapes such as chairs and sculptures.
The FFD modifier surrounds the selected geometry with a lattice box. By adjusting the control points of the lattice, you deform the enclosed geometry. With the Auto Key button turned on, you can animate the lattice points, and thus the deformation of the geometry.

FFD deformation creates a bulge in the snake.
With the FFD(box) and FFD(cyl) modifiers you can create box-shaped and cylinder-shaped lattice free-form deformation objects. Both are available as object modifiers and as space warps.
The source lattice of an FFD modifier is fitted to the geometry it's assigned in the stack. This can be a whole object, or a sub-object selection of faces or vertices.

At this sub-object level, you can select and manipulate control points of the lattice, one at a time or as a group (select multiple points using standard techniques). Manipulating control points affects the shape of the underlying object. You can use standard transformation methods with the control points. If the Auto Key button is turned on when modifying the control points, the points become animated.
At this sub-object level, you can position, rotate, or scale the lattice box separately from the geometry. If the Auto Key button is turned on, the lattice becomes animated. When you first apply an FFD, its lattice defaults to a bounding box surrounding the geometry. Moving or scaling the lattice so that only a subset of vertices lie inside the volume makes it possible to apply a localized deformation.
At this sub-object level, the deformation lattice control points turn green, and you can select and manipulate control points without affecting the modified object. This lets you fit the lattice more precisely to irregular-shaped objects, giving you finer control when deforming.
Set Volume essentially lets you set the initial state of the lattice. If a control point is already animated or the Animate button is turned on, then Set Volume works the same as at the Control Points sub-object level, deforming the object as you manipulate points.
For more information on the stack display, see Modifier Stack.
Adjusts the unit dimensions of the source volume and specifies the number of control points in the lattice. Note that the point dimensions also show up beside the modifier name in the stack list.
Provides controls that specify which vertices are affected by the FFD.
Deforms all vertices regardless of whether they lie inside or outside the source volume depending on the value in the Falloff spinner. The deformation outside the volume is a continuous extrapolation of the deformation inside the volume. Note that the deformation can be extreme for points far away from the source lattice.
Determines the distance from the lattice that the FFD effect will decrease to zero. Available only when you choose All Vertices. When set to 0, it's effectively turned off, and there is no falloff. All vertices are affected regardless of how far they are from the lattice. The units of the Falloff parameter are actually specified relative to the size of the lattice. A falloff of 1 means that the effect will go to 0 for points that are a lattice width/length/height away from the lattice (depending on which side they are).
Adjusts the tension and continuity of the deformation splines. Although you can't actually see the splines in an FFD, the lattice and control points represent the structure that controls the splines. As you adjust the control points, you alter the splines (which move through each of the points). The splines, in turn, deform the geometry of the object. By altering the tension and continuity of the splines, you alter their effect on the object.
Provides additional methods of selecting the control points. You can toggle the state of any combination of the three buttons to select in one, two, or three dimensions at once.
By default, the control points of an FFD lattice don't appear in Track View because they don't have controllers assigned to them. But when you animate a control point, a controller is assigned and it becomes visible in Track View. You can also add and delete keys and perform other key operations. Animate All assigns Point3 controllers to all control points so that they're immediately visible in Track View.