Command entry:
Main toolbar


(Render Setup)
Render Setup dialog
Assign Renderer rollout
Choose "iray Renderer" as the Production renderer.
Renderer panel
Advanced Parameters rollout
Command entry:Rendering menu
Render Setup
Render Setup dialog
Assign Renderer rollout
Choose "iray Renderer" as the Production renderer.
Renderer panel
Advanced Parameters rollut
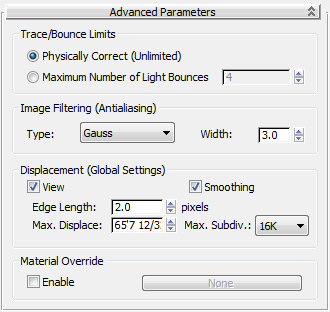
The Advanced Parameters rollout contains more specific controls for the iray renderer.
Interface
Trace/Bounce Limits group
- (The default.) When chosen, light bounces are unlimited, and are calculated as long as the renderer continues to run.
- When chosen, limits the number of light bounces to the value you set. Default=4.
Limiting the number of light bounces can speed up a rendering. This option can be helpful when you want to render a preview
that doesn’t have to have full and finished reflections.
If you limit the number of light bounces, scenes can appear darker than the final rendering with unlimited bounces would appear.
This is true especially for interior scenes, and exterior scenes that are lit from all around (typically by the sky).
Image Filtering (Antialiasing) group
Determines how multiple samples are combined into a single pixel value.
- Type
-
- Sums all samples in the filter area with equal weight. This is the quickest sampling method.
- (The default.) Weights the samples using a Gauss (bell) curve centered on the pixel.
- Weights the samples using a pyramid centered on the pixel.
- Width
-
Specifies the width and height of the sample area. Increasing the value of Width can soften the image, but it increases render
time. Default=3.0.
Displacement (Global Settings) group
- View
-
Defines the space for displacement. When View is on, the Edge Length specifies the length in pixels. When off, the Edge Length
is specified in world space units. Default=on.
- Smoothing
-
Turn off to have the iray renderer correctly render height maps. Height maps can be generated by Normal Bump mapping.
When using only height maps in the scene, make sure this option is off. If some objects in the scene use height maps while
others use standard displacement, apply smoothing on a per-object basis.
When on, the iray renderer simply smoothes the geometry using the interpolated normals, making the geometry look better. This
result, however, cannot be used for height map displacement because smoothing affects geometry in a way that is incompatible
with height mapping.
- Edge Length
-
Defines the smallest potential edge length due to subdivision. The iray renderer stops subdividing an edge once it reaches
this size. Default=2.0 pixels.
- Max. Displace
-
Controls the maximum offset, in world units, that can be given to a vertex when displacing it. This value can affect the bounding
box of an object. Default=0.508m (meters).
TipIf displaced geometry appears to be “clipped,” try increasing the value of Maximum Displace.
- Max. Subdiv.
-
Controls the extent to which the iray renderer can recursively subdivide each original mesh triangle for displacement. Each
subdivision recursion potentially divides a single face into four smaller faces. Choose the value from the drop-down list.
Range=4 to 64K (65,536). Default=16K (16,384).
For example, using the default value means that the iray renderer can subdivide each displaced mesh triangle into as many
as 16,384 smaller triangles.
Material Override group
Material Override allows you to render a scene with all its materials replaced by a single master material. For example, if
you want to do a shadow study using volume only, with a single uniform color, use these controls to specify a neutral gray
material. When you render, all surfaces will use the gray material.
- Enable
-
When on, rendering uses the override material for all surfaces. When off, surfaces are rendered with the material applied
to them in the scene. Default=off.
- Material
-
Click to display the Material/Map Browser and choose a material to use as the override. Once you have chosen an override material,
this button displays the material name.