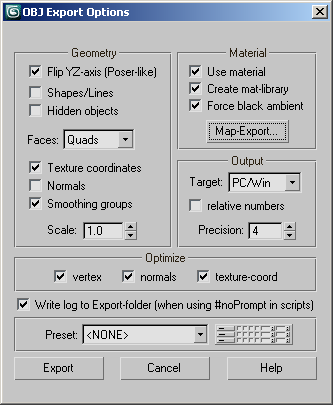
The ASCII-based OBJ format makes it possible to exchange graphical data between many applications. Both polygons and freeform
geometries such as curves are supported with this format. You can export 3ds Max files to this format.
Procedure
To export scene geometry to an OBJ file:
- From the

 Application menu, choose Export. Or, to export only the current selection, choose Export Selected.
The Select File To Export dialog opens.
- Enter the file name, optionally with the .obj file name extension. If you don’t enter the extension, open the Save As Type drop-down list and choose gw::OBJ-Exporter (*.OBJ).
- Click Save.
The exporter dialog opens.
- Set parameters manually, or choose the name of the target program from the Preset drop-down list. Optionally click Map-Export
and set map-export parameters.
- Click Export.
During export, a dialog showing progress and the names of exported objects opens. When the export is finished, click DONE
to return to 3ds Max.
Interface
Geometry group
- Flip YZ-axis
-
When on, transfers all Y-axis values to the Z axis and vice-versa. Use this when exporting to Poser and other programs that
use Y as the vertical axis and Z as the depth axis.
- Shapes/Lines
-
Enables export of splines and NURBS curves.
NoteNURBS curves are exported as splines.
- Hidden Objects
-
When on, hidden objects are exported.
- Faces
-
Choose whether the mesh faces are stored as triangles, quadrangles, or polygons.
- Texture coordinates
-
When on, texture coordinates are stored with the exported file. When you import the file in another application you will be
able to use this information if it is supported.
- Normals
-
- Smoothing groups
-
- Scale
-
Determines the scaling for the contents of the OBJ file. The default value of 1.0 means no scaling is performed.
Material group
- Use material
-
Determines whether the materials associated with the scene objects are also exported to the OBJ file.
- Create mat-library
-
Determines whether the exporter creates a separate file to store information about the materials. This creates a MTL library
file in the same directory as the OBJ file.
If Use Material is on but Create Mat-library is off, the OBJ file contains a reference to a like-named MTL file, but the MTL
file is not saved. Use this to save time if the MTL file already exists.
- Force black ambient
-
Sets the Ambient component of exported materials to black.
- Map-Export
-
Output group
- Target
-
Sets the target operating system of the computer on which the exported data is to be used. Technically, this setting determines
the line-end characters for the ASCII OBJ file.
- Relative numbers
-
Causes face vertex indices in exported files to be expressed as relative (i.e., negative) numbers. This can cause compatibility
issues when importing with certain programs. If you're unable to import an OBJ file, make sure this option is off and export
again.
- Precision
-
The precision of the exported vertex data, as expressed by the number of decimal places.
Optimize group
- Optimize
-
Removes duplicate elements of the indicated type or types: vertices, face normals, and texture coordinates.
- Write log to Export-folder
-
Saves a log file to the same folder as the OBJ file when exporting via script.
- Preset
-
When exporting to a specific application, choose that application from the list. Presets comprise all export settings, including
geometry and materials.
 [edit presets]
-
Click to open a dialog that lets you edit the presets. To change the map path for a preset, edit the map-path setting manually
or click the folder button at the right end of the row and navigate to the new path.
While the Presets dialog is open, you can choose a preset by clicking its name (the row highlights) and then clicking OK.
_____
- Export
-
Saves the exported files (OBJ + optional maps and material library) according to the current settings.
During the export, a dialog shows the progress and saved files. When it’s finished, click DONE to close the dialog.
- Cancel
-
- Help
-
Opens the help file to this topic.
- About
-
Opens a small dialog with information about this plug-in. To close the dialog, click the image.

 Application menu, choose Export. Or, to export only the current selection, choose Export Selected.

 [edit presets]