Command entry:
Main toolbar


(Render Setup)
Render Setup dialog
Render Elements panel
Render Elements rollout
Add button
Render Elements dialog
Add mr Shader Element to the elements list (or highlight an mr Shader Element entry in the list).
Command entry:Rendering menu
Render Setup
Render Setup dialog
Render Elements panel
Render Elements rollout
Add button
Render Elements dialog
Add mr Shader Element to the elements list (or highlight an mr Shader Element entry in the list).
The mr Shader element outputs the raw contribution of any mental ray shader in the scene. This includes standard 3ds Max materials and maps that are converted to mental ray shaders in the translation process. The output of this element does not
figure into the final rendered output.
For example, you could use the mr Shader element to render a few different ambient occlusion passes (see mental images Shader Libraries).
NoteThe mr Shader element is intended primarily for rendering shaders, not full materials. While you can, in most cases, most
"material-style" shaders might contain their own code to write to render elements, and in some circumstances this can cause
odd conflicts. For example, piping a Standard material through a
Material To Shader shader into the mr Shader element is not recommended because it could cause the Standard material’s render element to collide with
the original render elements from the main render.
Procedure
To use the mr Shader element:
- In the Material Editor, determine which shader to output as a separate element. For example, an Arch & Design material might
contain a Gradient map assigned as a Diffuse Color shader, and one of the Gradient maps could be assigned a Checker map, and one of the Checker maps could be assigned
a Noise map. This procedure will assume you want to render the Checker map and its constituent Noise map to an element.
So the material structure would be like this:
A&D material Gradient (Diffuse Color) Checker (Gradient Color #1) Noise (Checker Color #1)
- On the Render Setup dialog Render Elements panel Render Elements rollout, click Add. Choose the mr Shader Element item from the list.
- On the Parameters rollout for the element, click the Shader button; this opens the Material/Map Browser dialog.
- Make sure Browse From on the dialog is set to Scene. If the object to which the shader is applied is selected, you could also
choose Selected. In the material tree, highlight the shader to output as an element.
NoteAny subordinate shaders are also included in the element output.
- Set up the other Render Element parameters as necessary and then render the scene.
Your Shader element is rendered to an image file.
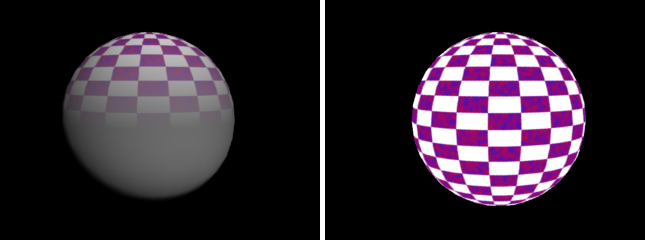
The following illustration shows the example described in the preceding procedure. The left-hand image shows the full material,
with the Noise inside the Checker inside the Gradient, and the right-hand image shows a Shader element containing only the
Noise inside the Checker. The element renders the entire Checker map even though only part of it is used by the Gradient map.
Interface
- Shader
-
The shader to render as an element. Click the button and then choose a shader or material from the list in the Material/Map
Browser. Typically you’d want the element to output a shader in the scene, so you’d make sure Browse From is set to Selected
or Scene.
- Multiplier
-
Scales the brightness of the rendered output.
- Apply Shadows
-
When on, the output includes shadows cast on the surface.